...
| Seiteneigenschaften |
|---|
Description:
Ein WLAN-Controller verwaltet Access Points und weist diesen WLAN-Parameter zu, mit denen diese betrieben werden sollen. Fungiert der WLAN-Controller auch als Gateway (etwa bei Betrieb als Public Spot) oder bei Verwendung eines WLC-Tunnels, stellt der WLAN-Controller einen "Single point of failure" dar.
Es ist daher in einem solchen Szenario sinnvoll mindestens einen weiteren WLAN-Controller zwecks Bildung einer Redundanz einzubinden. Es ist dabei möglich eine Lastverteilung zu konfigurieren, sodass sich die Access Points auf die WLAN-Controller verteilen. Weiterhin kann ein WLAN-Controller als Standby fungieren, sodass sich die Access Points im Fehlerfall mit dem zweiten Standby WLAN-Controller verbinden, sobald der erste ausfällt.
Wichtig:
Bei einem Wechsel des WLAN-Controllers werden alle Sessions unterbrochen (bei Funktion als Gateway). Diese müssen dann von den Endgeräten neu aufgebaut werden.
Speziell bei der Verwendung als Public Spot ist zu beachten, dass die Benutzer-Informationen wie bisherige Laufzeit nicht auf weitere WLAN-Controller übertragen werden. Die Laufzeit von Public Spot Benutzern beginnt somit von Neuem.
Requirements:
A WLAN controller manages access points and assigns them the WLAN parameters they need to operate. If the WLAN controller also functions as a gateway (for example when operating as a Public Spot) or it operates a WLC tunnel, the WLAN controller represents a “single point of failure”.
In a scenario like this, having at least one additional WLAN controller for redundancy is an advantage. You can configure load balancing so that the access points are distributed between the WLAN controllers. Furthermore, one WLAN controller can be configured as a standby unit, so that if a problem occurs, the access points connect to the second standby WLAN controller as soon as the first one fails.
| Hinweis |
|---|
|
Requirements:
- LCOS as of version LCOS ab Version 9.0 (download latest Version)
- LANtools ab Version as of version 9.0 (download latest Version)
- The second WLAN Controller (Slave) must must be unconfigured and still with its factory settings!
- The option Certificate authority (CA) active in the menu Certificates → Cert. authority (CA) on the second WLAN Controller (Slave) must not be active!
Scenario:
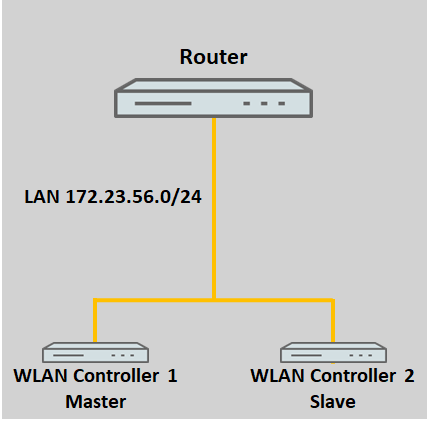
1. Beide WLAN-Controller befinden sich im gleichen Netzwerk:Befinden sich die WLAN-Controller im gleichen Netzwerk, können diese sich automatisch per Broadcast finden) Both WLAN controllers are in the same network:
If the WLAN controllers are both in the same network, they will discover one another automatically by broadcast.
2. Beide WLAN-Controller befinden sich in unterschiedlichen Netzwerken:
Befinden sich die WLAN-Controller im unterschiedlichen Netzwerken, müssen die IP-Adressen der WLAN-Controller gegenseitig manuell bekanntgegeben werden.
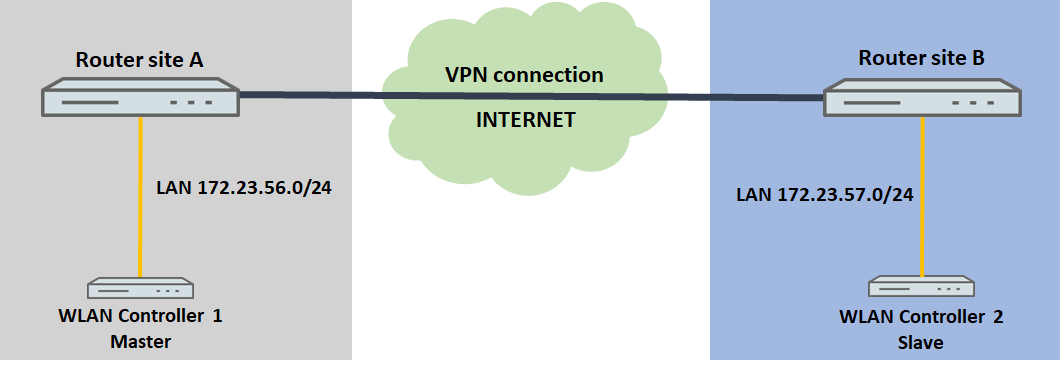
In der Regel werden sich die WLAN-Controller in einem solchen Szenario an unterschiedlichen Standorten befinden, wie in der Szenario-Grafik zu sehen. Es ist aber auch denkbar, dass die WLAN sich am gleichen Standort befinden aber in getrennten Netzwerken.
Vorgehensweise:
Die Konfiguration des WLC-Clusters gestaltet sich grundsätzlich für beide Szenarien gleich. Lediglich die Bekanntgabe der anderen WLC-Cluster Teilnehmer ist anders (siehe Schritt 3.).
1. Konfiguration des ersten WLAN-Controllers (Master):
1.1 Führen Sie die Grundeinrichtung des WLAN-Controllers wie in diesem Knowledge Base Artikel beschrieben durch.
1.2 Konfigurieren Sie anschließend die WLAN-Profile nach Bedarf. Folgend finden Sie zwei Beispiele:
) The two WLAN controllers are in different networks:
If the WLAN controllers are in different networks, the IP addresses of the WLAN controllers must be made known to one another manually.
Usually, the WLAN controllers will be located at different locations in a scenario like that pictured below. It is also conceivable that the WLAN controllers are at the same location but in separate networks.
Procedure:
The configuration of the WLC cluster is basically the same for both scenarios. The only difference is the way that the other WLC cluster member is announced (see step 3.).
| Hinweis |
|---|
When using the table "Access stations" in the menu Management → Admin → Access settings → Configuration access ways the IP address (e.g. IP address 192.168.1.1 Netmask 255.255.255.255) or the whole network of the other WLAN Controller (e.g . IP address 192.168.1.0 Netmask 255.255.255.0) has to be entered in the table in order for the devices to be able to communicate with each other! The option WLC data tunnel active in the menu WLAN Controller → General must not be activated on any of the devices! |
1) Configuring the first WLAN controller (master):
1.1) Perform the basic setup of the WLAN controller as described in this knowledge base article.
1.2) Then configure the WLAN profiles as required. Here are two examples:
- WLAN layer-3 tunneling tutorialTutorial WLAN Layer-3 Tunneling: WLAN controller with Public Spot
- Manually configuring a guest network on a WLAN controller by means of VLAN
1.3 Wechseln Sie in das Menü Management → General und vergeben einen aussagekräftigen ) Change to the menu Management → General and set a descriptive Device name.
1.4 Wechseln Sie in das Menü ) Go to the menu Certificates → Cert. authority (CA) und speichern sich den and save the CA Distinguished Name zur späteren Verwendung ab for later use.
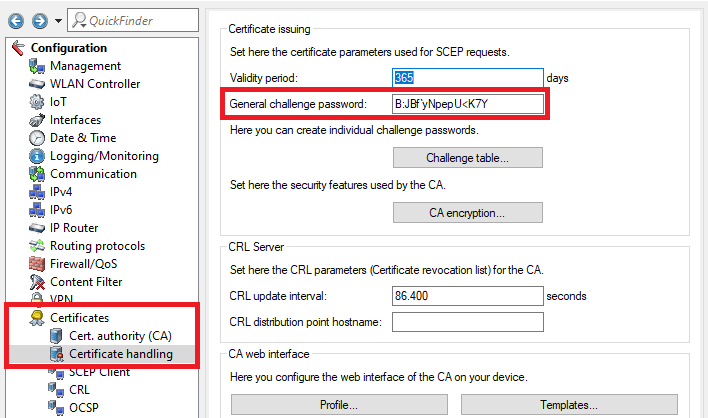
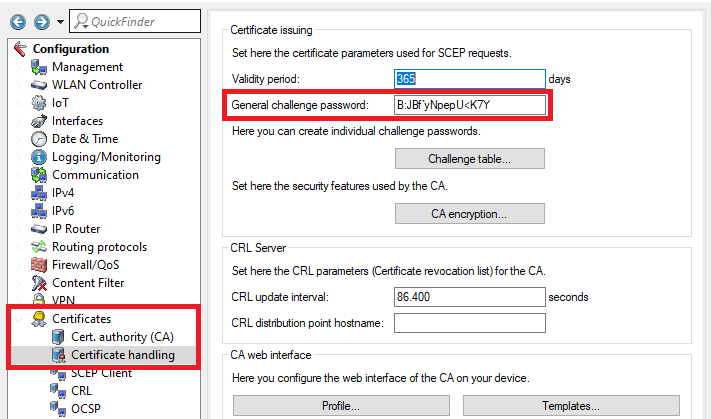
1.5 Wechseln Sie in das Menü ) Open the menu Certificates → Certificate handling und speichern sich das General challenge password zur späteren Verwendung abhandling and save the General challenge password for later use.
1.6 Die Konfiguration des ersten WLAN-Controllers ist damit abgeschlossen.
2. Konfiguration des zweiten WLAN-Controllers (Slave):
Wichtig:
Der zweite WLAN-Controller darf nicht konfiguriert sein und muss sich noch im Werkszustand befinden!
2.1 Saving a configuration or script file in LANconfig
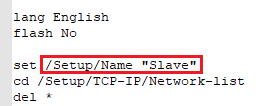
2.2 Bearbeiten Sie die Skript-Sicherung in einem Texteditor und passen folgende Punkte an:
- Navigieren Sie in den Pfad Setup/Name und passen den Device name an.
) The configuration of the first WLAN controller is now complete.
2) Configuring the second WLAN controller (slave):
| Hinweis |
|---|
The second WLAN controller must be unconfigured and still with its factory settings! |
2.1) Save the configuration of the first WLAN controller as a script file.
2.2) Open the script backup in a text editor and edit the following items:
- Navigate in the path Setup/Name and adjust the Device name.
- Navigate to the path Navigieren Sie in den Pfad Setup/TCP-IP/Network-list und passen die IP-Adressen aller Netzwerke an, sodass jedem WLAN-Controller eine eindeutige IP-Adresse zugewiesen wurde.
- Löschen Sie alle Einträge, die zum Pfad Setup/Certificates gehören.
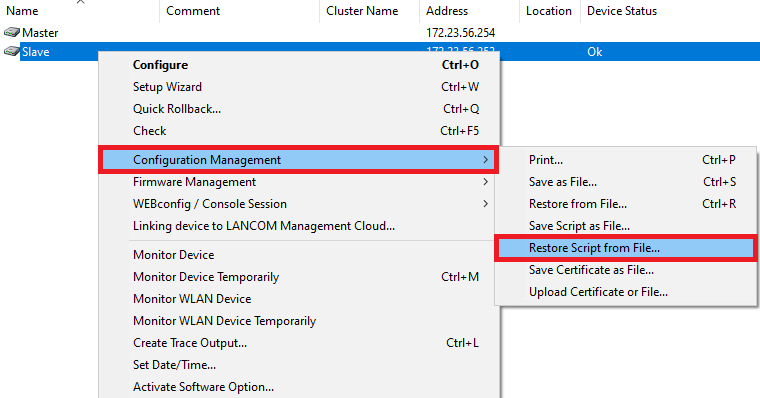
2.3 Laden Sie die angepasste Skriptsicherung in den zweiten WLAN-Controller hoch, indem Sie einen Rechtsklick auf den Slave WLAN-Controller ausführen und im Kontextmenü Configuration Management → Restore Script from File klicken.
...
- and adjust the IP addresses of all networks so that each WLAN controller has been assigned a unique IP address.
- Delete all entries in the path Setup/Certificates.
2.3) Upload your customized script backup to the second WLAN controller: Right-click on the slave WLAN controller and, in the context menu, click Configuration management → Restore script from file.
| Info |
|---|
Alternatively you can use LANconfig and drag & drop the script file from your folder onto the WLAN controller. |
2.4 Wechseln Sie in das Menü ) Change to the menu Management → Admin und hinterlegen ein and set a Main device password.
...
| Info |
|---|
The Main device password is not included in a script backup, so it has to be set manually afterwards. |
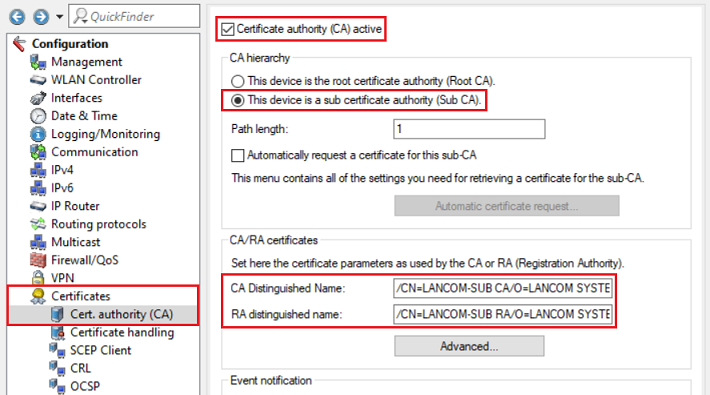
2.5 Wechseln Sie in das Menü Zertifikate → Zertifizierungsstelle (CA) und passen Sie folgende Parameter an:) Change to the menu Certificates → Cert. authority (CA) and modify the following parameters:
- Set a checkmark next to Certificate authority (CA) active.
- Select the radio button This device is a sub certificate authority
- Setzen Sie den Haken bei Zertifizierungsstelle (CA) aktiviert
- Wählen Sie den Auswahl-Knopf Dieses Gerät ist eine untergeordnete Zertifizierungsstelle (Sub-CA).
- Setzen Sie den Haken bei Automatisch ein Zertifikat für diese Sub-CA anfordern.
- Passen Sie den Adjust the Common Name (CN) des of the CA - Distinguished - Name an (etwa i.e. /CN=LANCOM-SUB).Passen Sie den
- Adjust the Common Name (CN) des of the RA - Distinguished - Name an (etwa i.e. /CN=LANCOM-SUB).
2.6 Wechseln Sie in das Menü Automatischer Zertifikatsbezug.
2.7 Passen Sie folgende Parameter an:
...
) Change to the menu Certificates → Certificate handling and enter the General challenge password of the master WLAN controller (see step 1.5).
2.8 Wechseln Sie in das Menü Zertifikate → Zertifikatsbehandlung und hinterlegen des Basis-Challenge-Passwort des Master WLAN-Controllers (siehe Schritt 1.5).
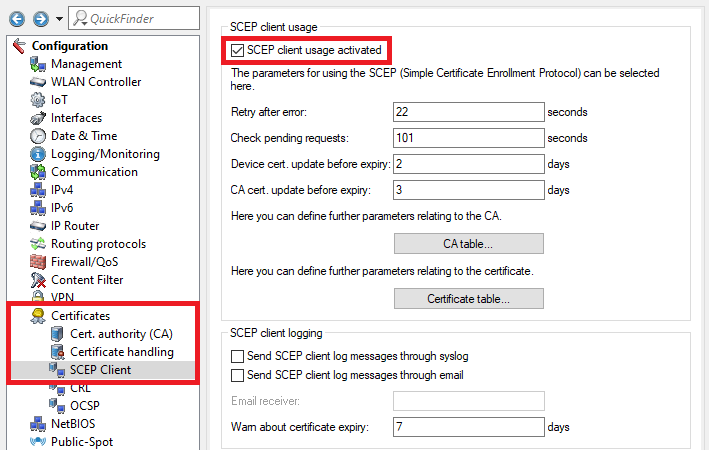
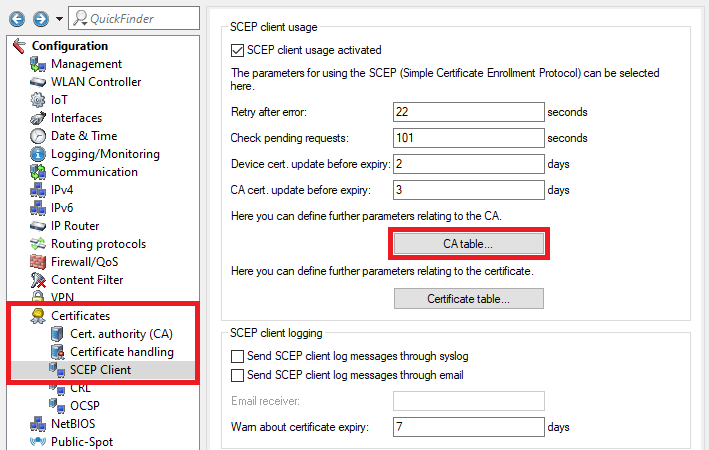
2.9 Wechseln Sie in das Menü Zertifikate → SCEP-Client und setzen den Haken bei SCEP-Client-Funktionalität aktiviert7) Go to the menu Certificates → SCEP client and set a checkmark next to SCEP client usage activated.
2.10 Wechseln Sie in das Menü CA-Tabelle8) Go to the menu CA table.
2.11 In der CA-Tabelle müssen zwei Einträge angelegt werden. Ein Eintrag dient dazu ein Controller-Zertifikat bei der eigenen Zertifizierungsstelle zu beziehen und der zweite Eintrag dient dazu die CA bei dem Master WLAN-Controller zu beziehen.
Erstellen Sie den ersten Eintrag und passen folgende Parameter an:
9) Two entries have to be created in the CA table. One entry serves to obtain a controller certificate from the device’s own certificate authority and the second entry serves to obtain the CA from the master WLAN controller.
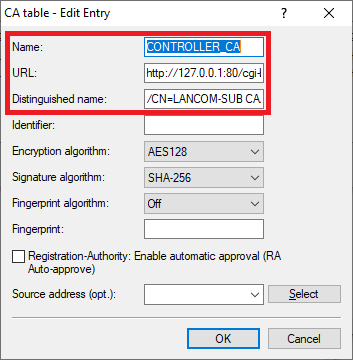
Create the first entry and adjust the following parameters:
- Name: Enter a descriptive name (in this example Name: Vergeben Sie einen aussagekräftigen Namen (in diesem Beispiel CONTROLLER_CA).
- URL: Hinterlegen Sie die Enter the URL http://127.0.0.1:80/cgi-bin/pkiclient.exe .
- Distinguished -Name: Hinterlegen Sie den CA-Distinguished-Name des Slave WLAN-Controllers (siehe Schritt name: Enter the CA distinguished name of the slave WLAN controller (see step 2.5).
Erstellen Sie den zweiten Eintrag und passen folgende Parameter an
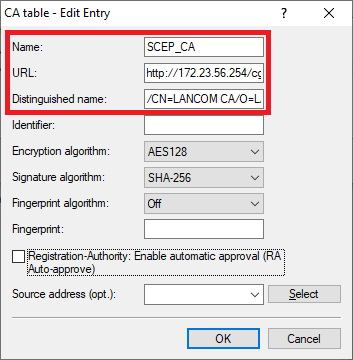
Create the second entry and adjust the following parameters:
- Name: Vergeben Sie einen aussagekräftigen Namen Enter a descriptive name (in diesem Beispiel this example SCEP_CA).
- URL: Hinterlegen Sie die Enter the URL http://172.23.56.254/cgi-bin/pkiclient.exe . Ändern Sie gegebenenfalls die IP-Adresse If necessary, change the IP address 172.23.56.254 in die IP-Adresse des Master WLAN-Controllers abto the IP address of the master WLAN controller.
- Distinguished -Name: Hinterlegen Sie den CA-Distinguished-Name des Master WLAN-Controllers (siehe Schritt name: Enter the CA distinguished name of the master WLAN controller (see step 1.4).
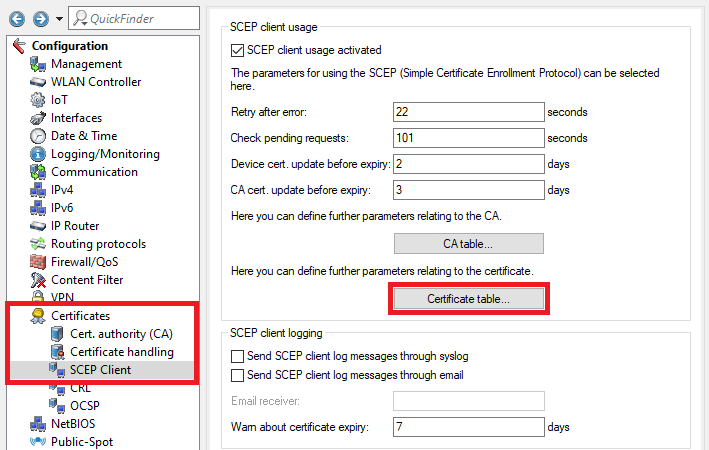
2.12 Wechseln Sie in das Menü Zertifikat-Tabelle.
2.13 In der Zertifikat-Tabelle müssen drei Einträge angelegt werden. Dort werden genauere Informationen wie Schlüssellänge und Subject für einzelne Zertifikate angegeben. Dies ist erforderlich, damit die Zertifikate mit den benötigten Merkmalen erstellt bzw. bezogen werden können.
Erstellen Sie den ersten Eintrag und passen folgende Parameter an:
10) Go to the menu Certificate table.
2.11) Three entries have to be created in the certificate table. These specify more detailed information for individual certificates, such as the Key length and Subject. This is necessary so that certificates with the required characteristics can be created and obtained.
Create the first entry and adjust the following parameters:
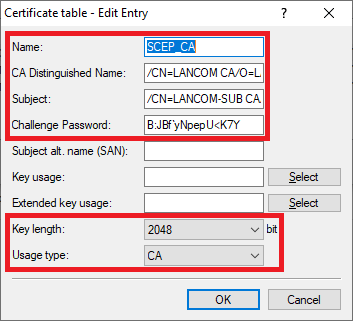
- Name: Enter a descriptive name (in this example Name: Vergeben Sie einen aussagekräftigen Namen (in diesem Beispiel SCEP_CA).
- CA -Distinguished-Name: Tragen Sie den CA-Distinguished-Name des Master WLAN-Controllers ein (siehe Schritt distinguished name: Enter the CA distinguished name of the master WLAN controller (see step 1.4).
- Subject: Tragen Sie als Subject den CA-Distinguished-Name des Slave WLAN-Controllers ein (siehe Schritt Set the subject as the CA distinguished name of the slave WLAN controller (see step 2.5).
- Challenge -Passwort: Hinterlegen Sie das Challenge-Passwort des Master WLAN-Controllers (siehe Schritt password: Enter the challenge password of the master WLAN controller (see step 1.5).
- Schlüssellänge: Wählen Sie im Dropdownmenü 2048 aus.
- Verwendungs-Typ: Wählen Sie im Dropdownmenü CA aus.
Erstellen Sie den zweiten Eintrag und passen folgende Parameter an:
- Key length: From the drop-down menu, select 2048.
- Usage type: From the drop-down menu, select CA.
Create the second entry and adjust the following parameters:
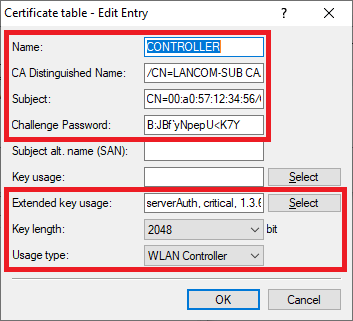
- Name: Enter a descriptive name (in this example Name: Vergeben Sie einen aussagekräftigen Namen (in diesem Beispiel CONTROLLER).
- CA -Distinguished-Name: Tragen Sie den CA-Distinguished-Name des Slave WLAN-Controllers ein (siehe Schritt distinguished name: Enter the CA distinguished name of the slave WLAN controller (see step 2.5).
- Subject: Tragen Sie als Subject CNSet the Subject to CN=00:a0:57:12:34:56/O=LANCOM SYSTEMS/C=DE ein, wobei die MAC-Adresse where the MAC address 00:a0:57:12:34:56 durch die MAC-Adresse des Slave WLAN-Controllers ersetzt werden mussshould be replaced by the MAC address of the slave WLAN controller.
- Challenge -Passwort: Hinterlegen Sie das Challenge-Passwort des Master WLAN-Controllers (siehe Schritt password: Enter the challenge password of the master WLAN controller (see step 1.5).
- Erw. Schlüssel-Verw.: Haken Sie im Auswahlmenü Extended key usage: In the selection menu, set check marks for the options serverAuth, critical und 1. and 3.6.1.5.5.7.3.18 an.
- Schlüssellänge: Wählen Sie im Dropdownmenü 2048 aus.
- Verwendungs-Typ: Wählen Sie im Dropdownmenü WLAN-Controller aus.
Erstellen Sie den dritten Eintrag und passen folgende Parameter an:
- Key length: From the drop-down menu, select 2048.
- Usage type: From the drop-down menu, select WLAN controller.
Create the third entry and adjust the following parameters:
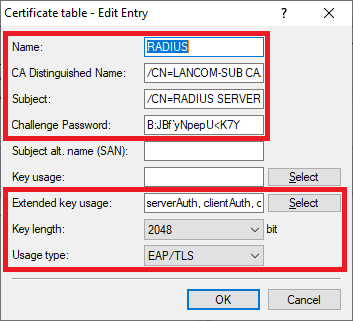
- Name: Enter a descriptive name (in this example RADIUS).
- CA distinguished name: Enter the CA distinguished name of the slave WLAN controller (see step
- Name: Vergeben Sie einen aussagekräftigen Namen (in diesem Beispiel RADIUS).
- CA-Distinguished-Name: Tragen Sie den CA-Distinguished-Name des Slave WLAN-Controllers ein (siehe Schritt 2.5).
- Subject: Tragen Sie als Subject Set the Subject to /CN=RADIUS SERVER/O=LANCOM SYSTEMS/C=DE ein.
- Challenge -Passwort: Hinterlegen Sie das Challenge-Passwort des Master WLAN-Controllers (siehe Schritt password: Enter the challenge password of the master WLAN controller (see step 1.5).
- Erw. Schlüssel-Verw.: Haken Sie im Auswahlmenü Extended key usage: In the selection menu, set check marks for the options serverAuth, clientAuth und and critical an.
- Schlüssellänge: Wählen Sie im Dropdownmenü 2048 aus.
- Key length: From the drop-down menu, select 2048.
- Usage type: From the drop-down menu, select EAP/TLSVerwendungs-Typ: Wählen Sie im Dropdownmenü EAP/TLS aus.
2.14 Die Konfigurationsschritte auf dem Slave WLAN-Controller sind damit abgeschlossen. Schreiben Sie die Konfiguration in das Gerät zurück.
3. Aktivieren des WLC-Clusters und Bekanntgabe der anderen WLC-Cluster Teilnehmer:
Die im folgenden beschriebenen Konfigurations-Schritte müssen auf beiden WLAN-Controllern ausgeführt werden. Die Konfiguration unterscheidet sich dahingehend, ob die WLAN-Controller sich im gleichen Netzwerk oder in unterschiedlichen Netzwerken befinden.
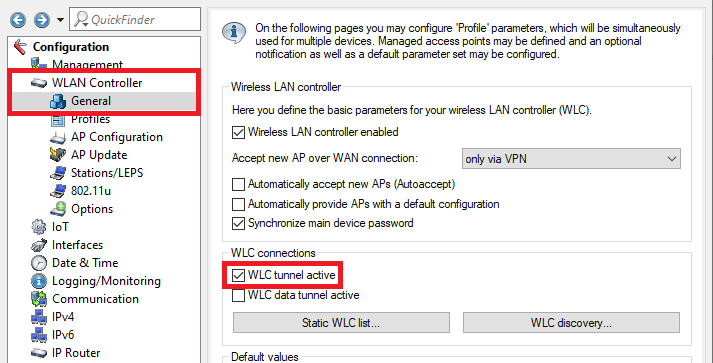
Wechseln Sie in das Menü WLAN-Controller → Allgemein und setzen den Haken bei WLC-Tunnel aktiv, um den WLC-Cluster zu aktivieren.
12) This concludes the configuration of the slave WLAN controller. You can now write the configuration back to the device.
3) Activate the WLC cluster and announce the other WLC cluster members:
The steps described in the following must be performed on both WLAN controllers. The configuration differs depending on whether the WLAN controllers are in the same network or in different networks.
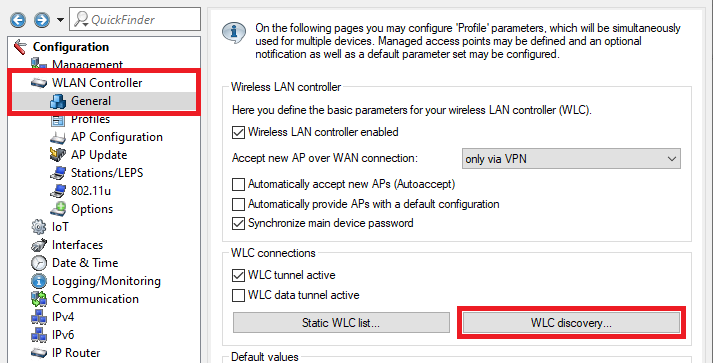
Change to the menu WLAN controller → General and enter a check mark for WLC tunnel active to activate the WLC cluster.
| Hinweis |
|---|
The option WLC data tunnel active must not be activated! |
3.1) Both WLAN controllers are in the same network3.1 Beide WLAN-Controller befinden sich im gleichen Netzwerk:
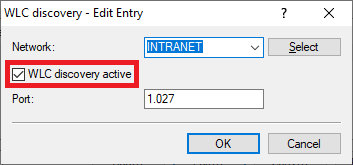
3.1.1 Wechseln Sie in das Menü WLC-Suche) Switch to the menu WLC discovery.
3.1.2 Bearbeiten Sie das Management-Netzwerk, in dem sich beide WLAN-Controller befinden und setzen den Haken bei WLC-Suche aktiv. Dadurch können sich die WLAN-Controller gegenseitig per Broadcast im lokalen Netzwerk finden.) Set the management network where the two WLAN controllers are located and check the box WLC discovery active. This enables the WLAN controllers to use a broadcast to find one another in the local network.
Info:
If you use a different management network, add this and activate the WLC search for this networkInfo:
Sollten Sie ein anderes Management-Netzwerk verwenden, so fügen Sie dieses hinzu und aktivieren für dieses Netzwerk die WLC-Suche.
3.2 Beide WLAN-Controller befinden sich in unterschiedlichen Netzwerken) The two WLAN controllers are in different networks:
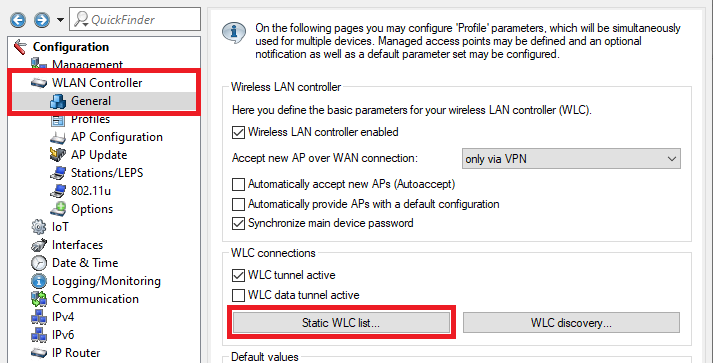
3.2.1 Wechseln Sie in das Menü WLAN-Controller → Allgemein → Statische WLC-Liste) Navigate to the menu WLAN controller → General → Static WLC list.
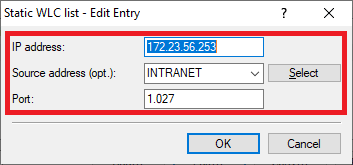
3.2.2 Erstellen Sie einen neuen Eintrag und passen folgende Parameter an) Create a new entry and modify the following parameters:
- IP -Adresse: Hinterlegen Sie die IP-Adresse des anderen WLAN-Controllers.address: Enter the IP address of the other WLAN controller.
- Source address Absende-Adresse (opt.): Wählen Sie im Dropdownmenü das Management-Netzwerk ausUse the drop-down menu to select the management network.
- Port: Tragen Sie den Port 1027 einEnter port 1027.
