| Seiteneigenschaften |
|---|
Description:
Damit bei einem Wechsel von einem LANCOM Router zu einer When switching from a LANCOM router to a LANCOM R&S®Unified Firewall die Profile der Advanced VPN Client Verbindungen nicht neu auf die Endgeräte ausgerollt werden müssen, ist es sinnvoll die Konfiguration der Advanced VPN Client Verbindungen vom Router in die , it makes sense to transfer the configuration of the Advanced VPN Client connections from the router to the LANCOM R&S®Unified Firewall zu übernehmen.so that the profiles of the Advanced VPN Client connections do not have to be rolled out to the end devices again.
This article describes how to transfer an IKEv2 connection for the Advanced VPN Client from a LANCOM router to a In diesem Artikel wird beschrieben, wie eine IKEv2 Verbindung für den Advanced VPN Client von einem LANCOM Router in eine LANCOM R&S®Unified Firewall übernommen werden kann.
| Info |
|---|
Das Szenario und die generelle Vorgehensweise entsprechen der Vorgehensweise bei der Einrichtung einer neuen IKEv2 Verbindung für den Advanced VPN Client auf einer The scenario and the general procedure correspond to the procedure for setting up a new IKEv2 connection for the Advanced VPN Client on a Unified Firewall. |
Requirements:
- LANCOM R&S® Unified Firewall mit with LCOS FX ab Version as of version 10.4
- LANCOM Advanced VPN Client ab Version as of version 4.1
- LCOS ab Version as of version 9.20 (download aktuelle Versionlatest version)
- LANtools ab Version from version 9.20 (download aktuelle Versionlatest version)
- Bereits eingerichtete und funktionsfähige Internet-Verbindung auf der A configured and functional Internet connection on the Unified Firewall
- Web -Browser zur Konfiguration der browser for configuring the Unified Firewall.
Es werden folgende Browser unterstützt
The following browsers are supported:- Google Chrome
- Chromium
- Mozilla Firefox
Procedure:
1. Auslesen der Authentifizierungs-Parameter der ) Reading out the authentication parameters of the Advanced VPN Client Verbindung im LANCOM Routerconnection from the LANCOM router:
1.1 Öffnen Sie die Konfiguration des LANCOM Routers in LANconfig und wechseln in das Menü VPN → IKEv2/IPSec ) Open the configuration of the LANCOM router in LANconfig and navigate to VPN→ IKEv2/IPsec → Authentication.

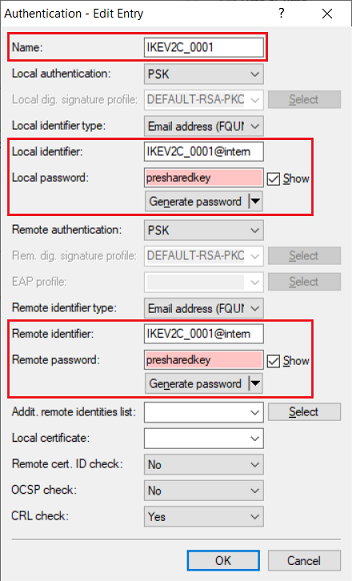
1.2 Öffnen Sie den Eintrag der VPN-Verbindung, welche auf die Unified Firewall übernommen werden soll und notieren die folgenden Parameter) Open the entry for the VPN connection to be transferred to the Unified Firewall and note the following parameters:
- Name
- Local identifier bzw. and Remote identifier
- Local password bzw. and Remote password
| Info |
|---|
Die Einträge für die Parameter The entries for the parameters Local identifier / Remote identifier und and Local password / Remote password werden durch den Setup-Assistenten im Router gleich gesetztare set the same in the router by the Setup Wizard. |
2. Konfiguration der ) Configuring the Advanced VPN Client Verbindung connection in der the Unified Firewall:
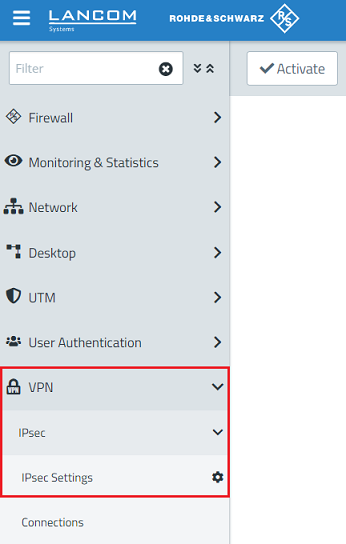
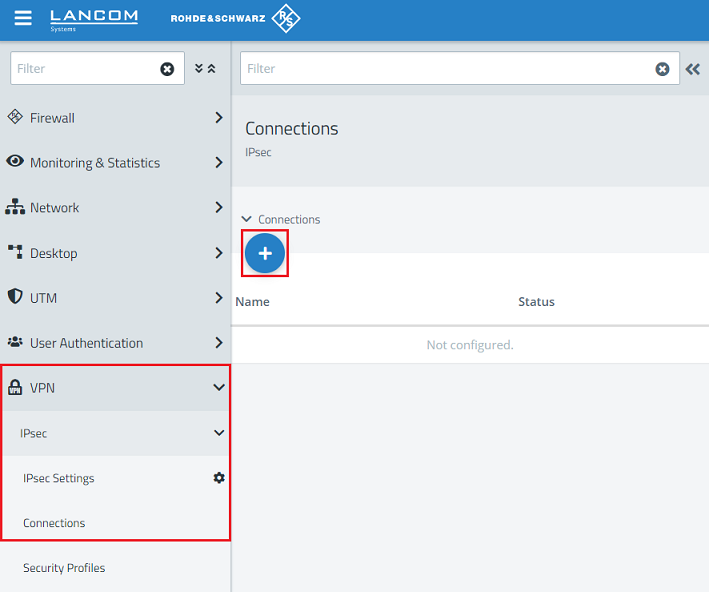
2.1 Verbinden Sie sich mit der Unified Firewall und wechseln in das Menü VPN → IPSec → IPSec ) Connect to the Unified Firewall and navigate to the menu VPN → IPsec → IPsec Settings.
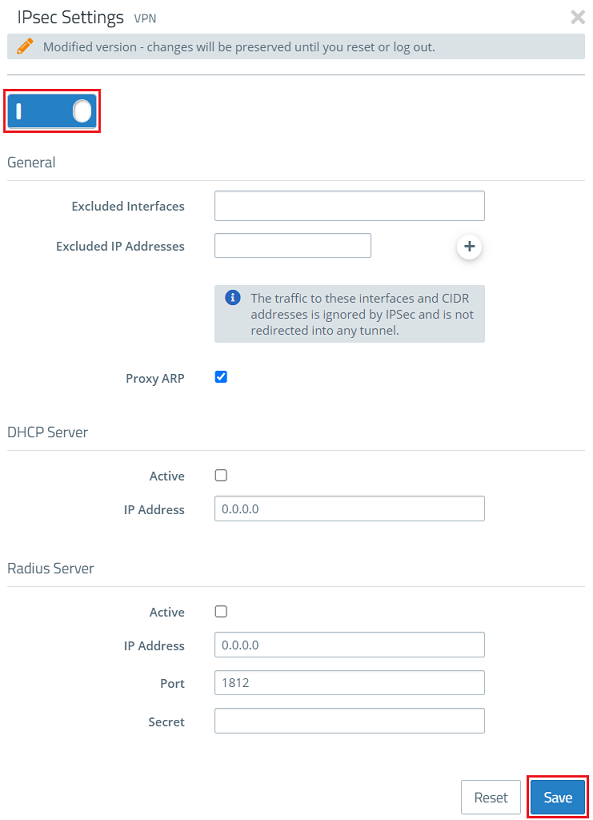
2.2 Stellen Sie sicher, dass IPSec aktiv ist) Check that IPsec is enabled.
2.3 Wechseln Sie in das Menü ) Go to the menu VPN → IPSec → Connections und klicken auf das "Plus-Zeichen", um eine neue VPN-Verbindung zu erstellenIPsec → Connections and click the “+” icon to create a VPN connection.
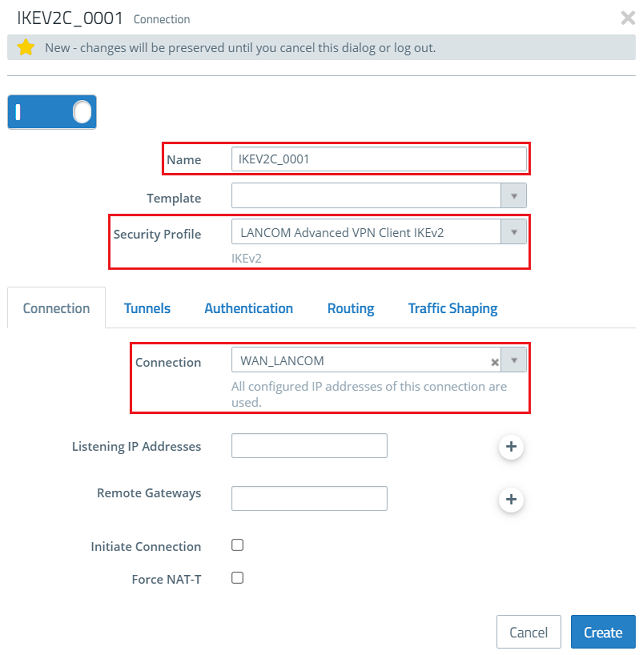
2.4 Passen Sie die folgenden Parameter an) Change the following parameters:
- Name: Tragen Sie den in Schritt Enter the name of the VPN connection on the router noted in step 1.2 notierten Namen der VPN-Verbindung auf dem Router ein (in diesem Beispiel this example IKEV2C_0001).
- Security Profile: Wählen Sie im Dropdownmenü das vorgefertigte Sicherheits-Profil Use the drop-down menu to select the ready-made security profile LANCOM Advanced VPN Client IKEv2 aus.
- Connection: Wählen Sie im Dropdownmenü die Internet-Verbindung der Unified Firewall ausUse the drop-down menu to select the Internet connection of the Unified Firewall.
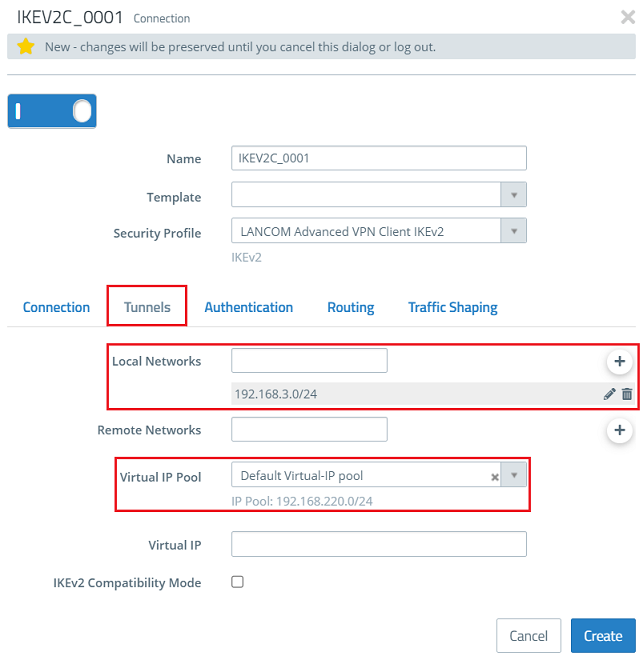
2.5 Wechseln Sie in den Reiter Tunnels und passen die folgenden Parameter an) Go to the Tunnels tab and modify the following parameters:
- Local Networks: Tragen Sie die lokalen Netzwerke in CIDR-Schreibweise networks: Using CIDR notation (Classless Inter Domain Routing) ein, in welche die Kommunikation über den enter those local networks in which communication via the Advanced VPN Client erlaubt sein is allowed (in diesem Beispiel die 192.this example the 168.3.0/24).
- Virtual IP Pool: Wählen Sie im Dropdownmenü die Option Default Virtual-IP pool aus, damit dem Advanced VPN Client eine IP-Adresse aus diesem Pool zugewiesen wirdFrom the drop-down menu, select the option Default virtual IP pool so that the Advanced VPN Client is assigned an IP address from this pool.
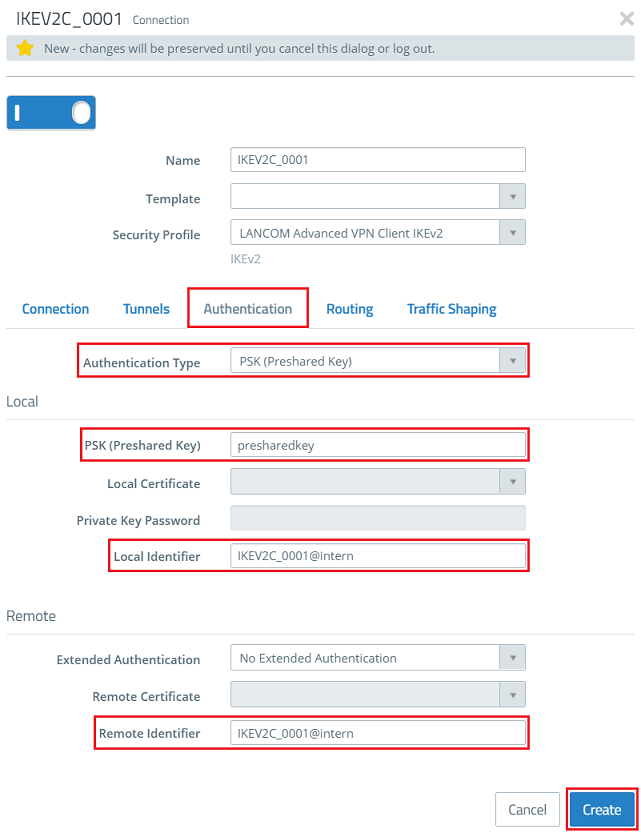
2.6 Wechseln Sie in den Reiter Authentication, passen die folgenden Parameter an und klicken auf ) Go to the Authentication tab, adjust the following parameters and click Create:
- Authentication Type: Wählen Sie im Dropdownmenü die Option Use the drop-down menu to select the option PSK (Preshared Key) aus.
- PSK (Preshared Key): Tragen Sie das in Schritt 1.2 notierte Enter the Local password / Remote password ein noted in step 1.2 (in diesem Beispiel this example presharedkey).
- Lokaler Local Identifier: Tragen Sie die in Schritt 1.2 notierte Enter the Local identifier / Remote identifier ein noted in step 1.2 (in diesem Beispiel this example IKEV2C_0001@intern0001@internal).
- Extended Authentication: Belassen Sie die Einstellung auf Leave the setting at No Extended Authentication.
- Remote Identifier: Tragen Sie die in Schritt 1.2 notierte Enter the Local identifier / Remote identifier ein noted in step 1.2 (in diesem Beispiel this example IKEV2C_0001@intern0001@internal).
| Info |
|---|
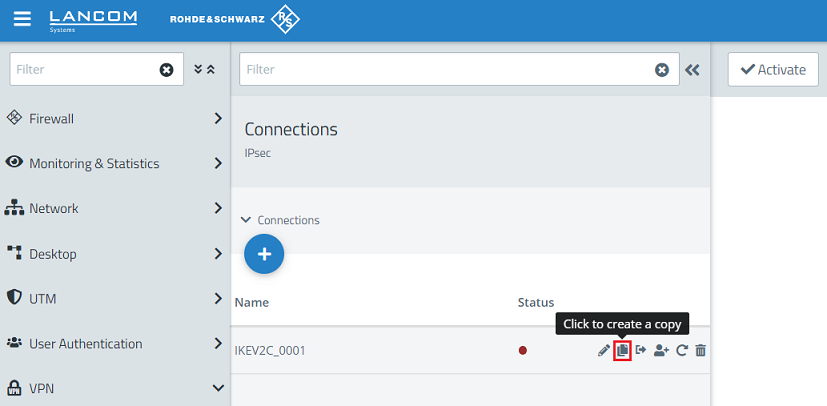
Sollen weitere VPN-Verbindungen übernommen werden, für welche die Kommunikation in das gleiche Netzwerk erlaubt sein soll, kann die vorhandene Verbindung kopiert werden. Es müssen dann nur noch der Name sowie die Authentifizierungsparameter angepasst werdenIf you need further VPN connections for which communication is to be permitted in the same network, this connection can be copied. You only need to adjust the Name and the authentication parameters.
|
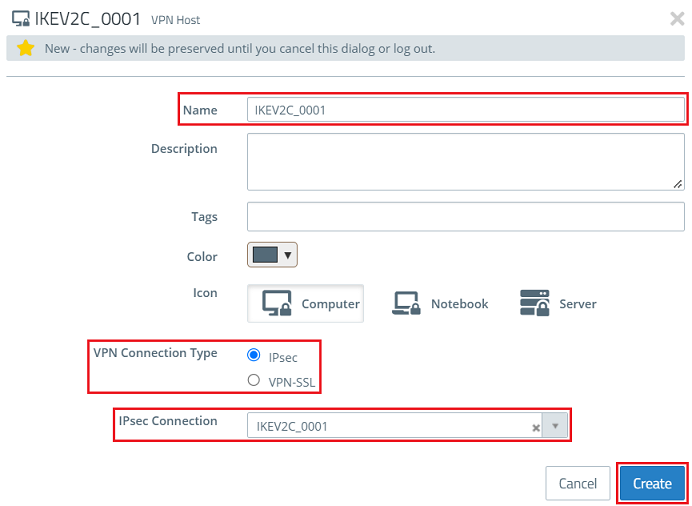
2.7 Klicken Sie auf das Symbol zum ) Click the icon to create a VPN host.

2.8 Passen Sie die folgenden Parameter an und klicken auf ) Modify the following parameters and then click Create:
- Name: Vergeben Sie einen aussagekräftigen Namen Enter a descriptive name (in diesem Beispiel this example IKEV2C_0001).
- VPN Connection Type: Wählen sie die Option IPSec ausSelect the option IPsec.IPSec
- IPsec Connection: Wählen Sie die in Schritt From the drop-down menu, select the VPN connection created in steps 2.3 - 2.6 erstellte VPN-Verbindung aus.
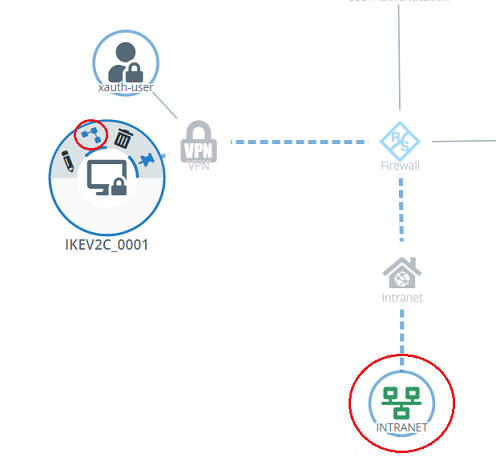
9. Klicken Sie auf dem Desktop auf den VPN-Host, wählen das "Verbindungswerkzeug" aus und klicken auf das Netzwerk, mit welchem die Kommunikation über den Advanced VPN Client erlaubt sein soll) Click the VPN host on the desktop, select the “connection tool” and click the network with which communication via the Advanced VPN Client should be allowed.
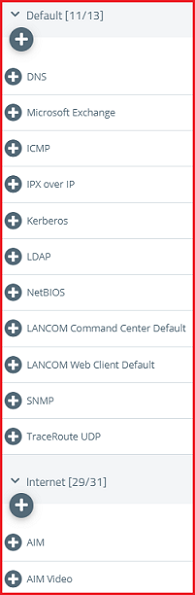
10. Weisen Sie dem VPN-Host die erforderlichen Protokolle über die "Plus-Zeichen" zu) Assign the necessary protocols to the VPN host using the “+” icons.
| Info |
|---|
Eine A Unified Firewall verwendet eine Deny-All Strategie. Die Kommunikation muss also explizit erlaubt werdenuses a deny-all strategy. You therefore have to explicitly allow communication. |
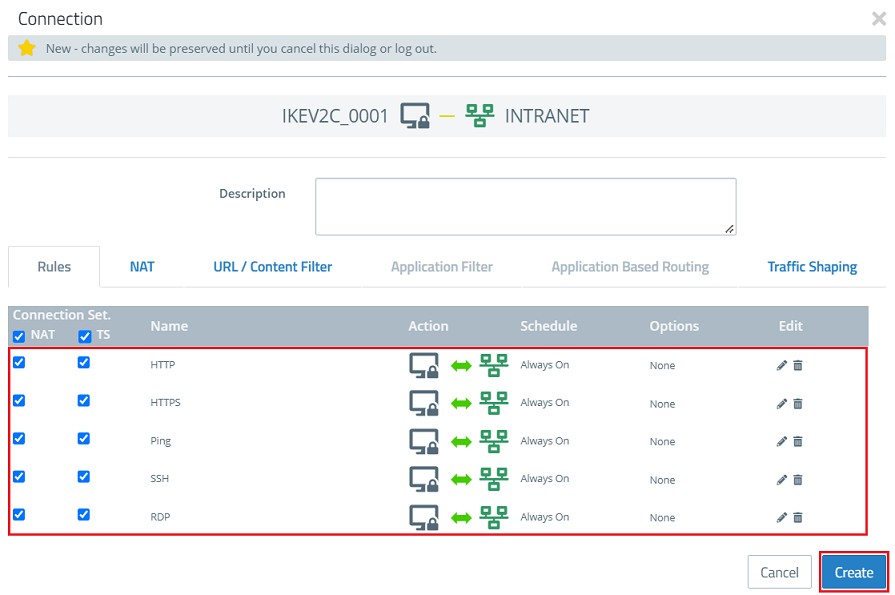
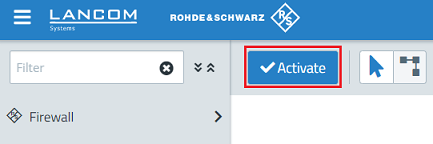
11. Klicken Sie abschließend auf Activate, damit die Änderungen übernommen werden) Finally, implement the changes by clicking Activate.