Description: This document describes how to update the firmware of managed LANCOM access points with a LANCOM WLAN controller with the use of a web server.
Procedure: 1) Open the configuration dialog of the WLAN controller in LANconfig and navigate to the tab WLAN controller -> AP update. 2) In the field Firmware URL, enter the address of the web server where the firmware file/s is/are saved (example: www.webserver.de/firmware/). 3) In the field Max no. of loaded firmware files enter the maximum number of files that the WLAN controller is to store in its memory at the same time. The default value is five. Depending on your requirements, you can vary the number between 1 and 10. 4) Click on the Firmware version management button. 5) Click on the Add button in the firmware version management dialog. 6) Using the drop-down menu, define the Device type for which the firmware is to be managed. 7) If you specify a MAC address, firmware management is limited to the specified device only. If you specify 000000000000 the entry applies for all units of the specified device type. Info: If you specify All under Device the firmware management applies to all devices. In this case it is possible to specify any MAC adress albeit it is advisable to specify the first address available in the drop-down menu ( 000000000000 ). 8) In the Version box, Specify the firmware version to be taken for the specified devices or device types. This is stated in the form: X.YY, e.g. 8.50. Information:- In the case of a firmware upgrade to a newer version, it is not necessary to create a completely new entry in the firmware management list. All you have to do is change the version number in the version field (e.g. to 9.24).
- The date allows you to downgrade to a specific firmware version within a release, for example from a Release Upgrade (RU) on an earlier upgrade. Possible values: 8 characters from 0123456789. The entry must match the format of the UPX header, e.g. "01092014" for the September 01, 2014.
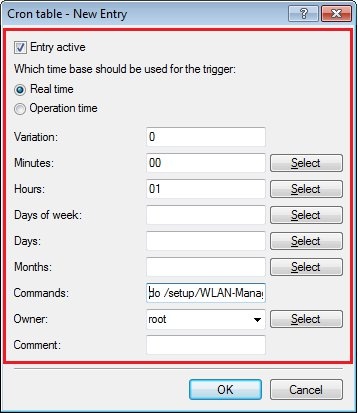
 9) Close the configuration dialogs with the OK button and write the configuration back to the WLAN controller. The firmware update commences once the configuration is written to the device. Information: The new firmware is only activated on the access points once they have been restarted. You can do this manually (as of step 10) . If it is not possible to reboot the access points during operations, you can create a cron job on the WLAN controller, which performs the restart during the night hours, for example: Open the configuration dialog Date & Time -> General -> Cron table for the WLAN controller. Click on the Add... button to create a new cron job. In the fields Minutes and Hours , enter the desired values. In this example, the cron job will run daily at 01:00 AM. In the Commands box enter the following command line: do /setup/WLAN-Management/Central-Firmware-Management/Reboot-updated-APs Close the configuration dialogs with the OK button and write the configuration back to the WLAN controller. 10) To restart the access points manually, open the configuration of the WLAN controller in WEBconfig and go into the menu LCOS menu tree -> Setup -> WLAN management -> Central firmware management. Here, click on the option Reboot updated APs. 11) Click on the Execute button in the next dialog window. 12) A message is displayed to indicate the execution of the reboot command. The access points with updated firmware now reboot. |