Description:
This article describes how VLAN is configured on a GS-3xxx series switch.
Important:
Please note how the different VLAN tagging modes work.
Requirements:
- LANCOM switch of the GS-3xxx series
- LANCOM router capable of managing at least three ARF networks
- LCOS as of version 8.50 (download latest version)
- LANtools as of version 8.50 (download latest version)
- Any web browser for accessing the web interface of the GS-3xxx
Scenario:
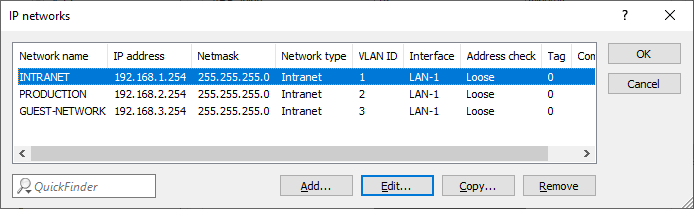
- Three networks are created on the LANCOM router with the VLAN IDs 1, 2 and 3. The management network here is the INTRANET with the VLAN ID 1.
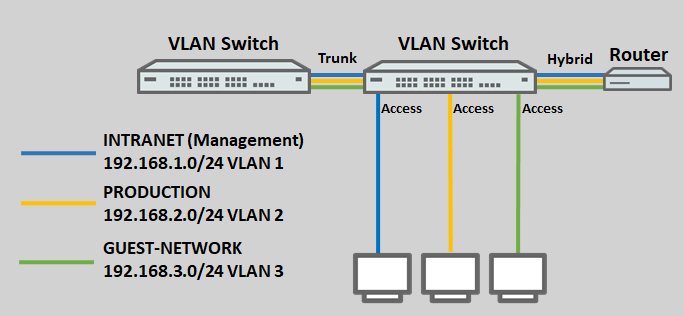
- The logical interface LAN-1 on the router is assigned the tagging mode Hybrid.
- A further VLAN-capable switch is used, which also supports the VLANs 1 – 3. The tagging mode used on this switch is Trunk.
- The ports on the switch are assigned as follows:
- Port 1 is connected to the router.
- Port 2 is connected to the second VLAN-enabled switch.
- Port 3 is connected to an end device that should access the network INTRANET.
- Port 4 is connected to an end device that should access the network PRODUCTION.
- Port 5 is connected to an end device that should access the GUEST NETWORK.
Procedure:
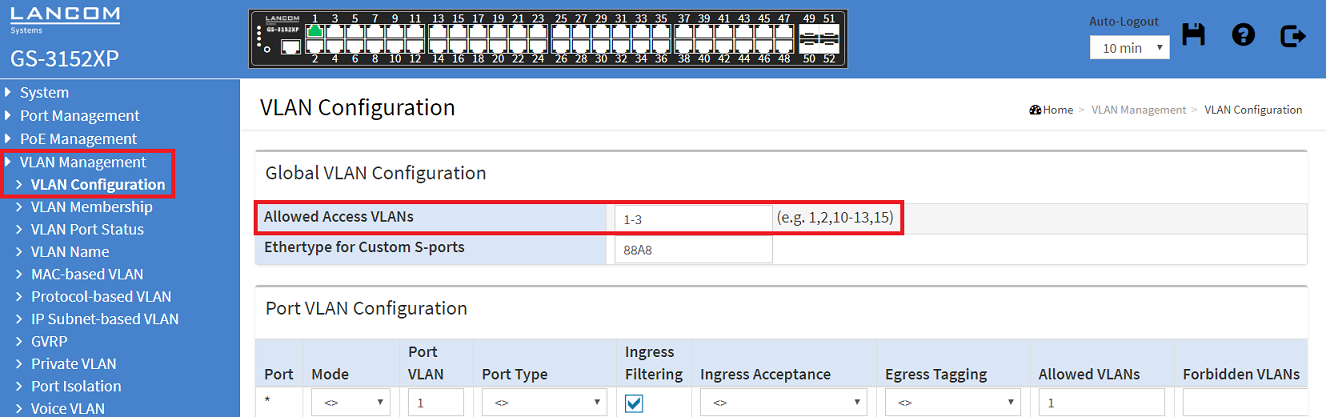
1) Connect to the web interface of the switch and navigate to the menu VLAN Management → VLAN Configuration.

2) Modify the following parameters:
- Port 1:
- Mode: Select the tagging mode Hybrid, as the router is also set to Hybrid (see Scenario).
- Port VLAN: Enter the VLAN ID 1 because the network INTRANET (VLAN ID 1) acts as a management network.
- Ingress Acceptance: Select Tagged and Untagged from the drop-down menu, because when using the Hybrid tagging mode, both tagged and untagged packets are allowed.
- Egress Tagging: Select Untag Port VLAN. When using the Hybrid tagging mode, the VLAN tag is removed from outbound packets that have the port VLAN ID (in this case VLAN ID 1).
- Allowed VLANs: Enter VLANs 1 - 3, because all VLANs created on the router are to be transmitted.
- Port 2:
- Mode: Select the tagging mode Trunk, as the other switch is also set to Trunk (see Scenario).
- Port VLAN: The VLAN ID can be left at the value 1. When using the Trunk tagging mode, the Port VLAN ID not used.
- Ingress Acceptance: Select Tagged Only from the drop-down menu, because when using the Trunk tagging mode, only tagged inbound packets are allowed.
- Egress Tagging: Select Tag All. When using the Trunk tagging mode, only tagged outbound packets are sent.
- Allowed VLANs: Enter VLANs 1 - 3, because all VLANs created on the router are to be transmitted to the other switch.
- Port 3:
- Mode: Select the tagging mode Access, because an end device that does not support VLAN is to be connected.
- Port VLAN: Enter the VLAN ID 1 because access to the INTRANET network requires the VLAN ID 1.
- Ingress Acceptance: When using the Access tagging mode, this setting is grayed out and cannot be changed.
- Egress Tagging: When using the Access tagging mode, this setting is grayed out and cannot be changed.
- Allowed VLANs: When using the Access tagging mode, this setting is grayed out and cannot be changed. The Port VLAN ID is entered automatically.
- Port 4:
- Mode: Select the tagging mode Access, because an end device that does not support VLAN is to be connected.
- Port VLAN: Enter the VLAN ID 2 because access to the PRODUCTION network requires the VLAN ID 2.
- Ingress Acceptance: When using the Access tagging mode, this setting is grayed out and cannot be changed.
- Egress Tagging: When using the Access tagging mode, this setting is grayed out and cannot be changed.
- Allowed VLANs: When using the Access tagging mode, this setting is grayed out and cannot be changed. The Port VLAN ID is entered automatically.
- Port 5:
- Mode: Select the tagging mode Access, because an end device that does not support VLAN is to be connected.
- Port VLAN: Enter the VLAN ID 3 because access to the GUEST NETWORK requires the VLAN ID 3.
- Ingress Acceptance: When using the Access tagging mode, this setting is grayed out and cannot be changed.
- Egress Tagging: When using the Access tagging mode, this setting is grayed out and cannot be changed.
- Allowed VLANs: When using the Access tagging mode, this setting is grayed out and cannot be changed. The Port VLAN ID is entered automatically.
Info:
In the case of Allowed VLANs, you can also specify non-contiguous ports by separating them with a comma (e.g. 1,3,5). You can also specify contiguous and non-contiguous ports in the same entry (e.g. 1,3,5-10).
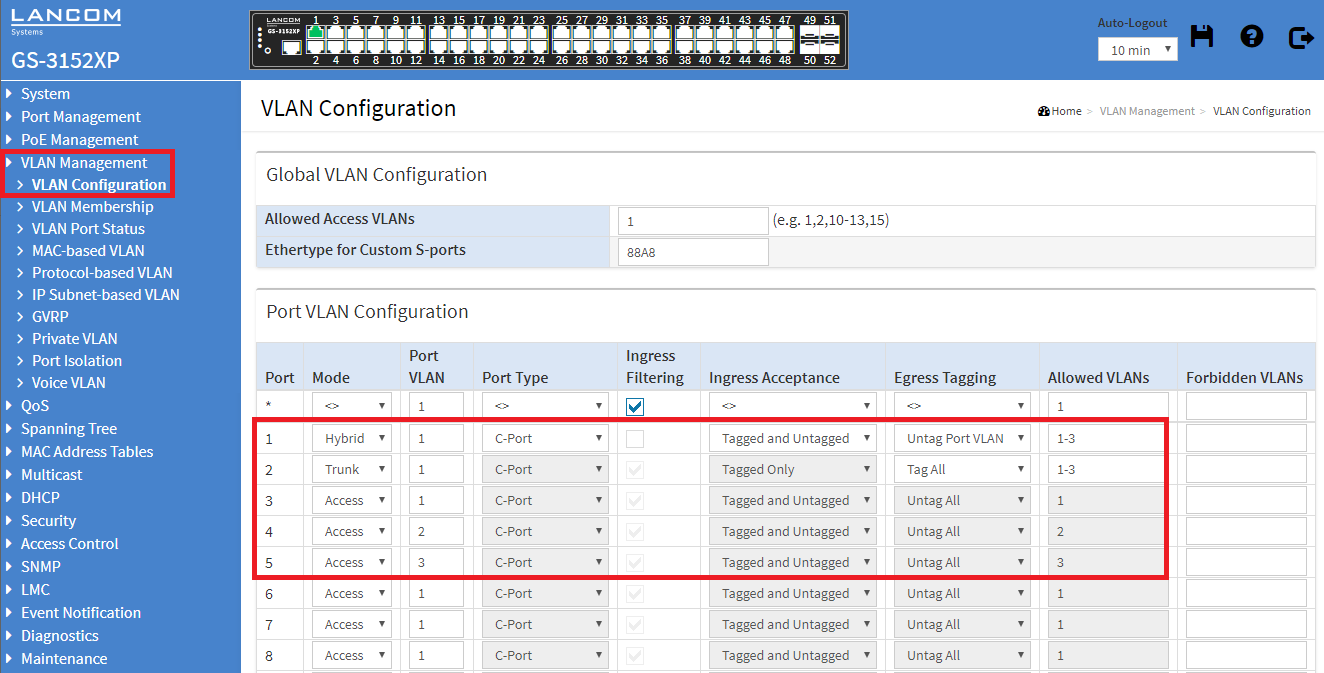
3) In the field Allowed Access VLANs enter all VLAN-IDs, which are used by ports with the tagging mode Access (in this example the VLAN-IDs 1-3).
Info:
In the case of Allowed Access VLANs, you can also specify non-contiguous ports by separating them with a comma (e.g. 1,3,5). You can also specify contiguous and non-contiguous ports in the same entry (e.g. 1,3,5-10).
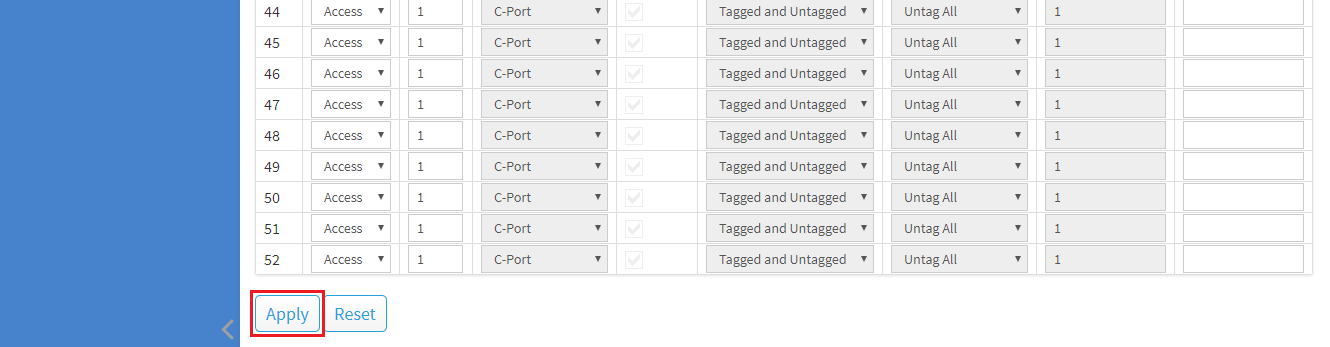
4) After completing the VLAN configuration, click Apply to keep the changes.
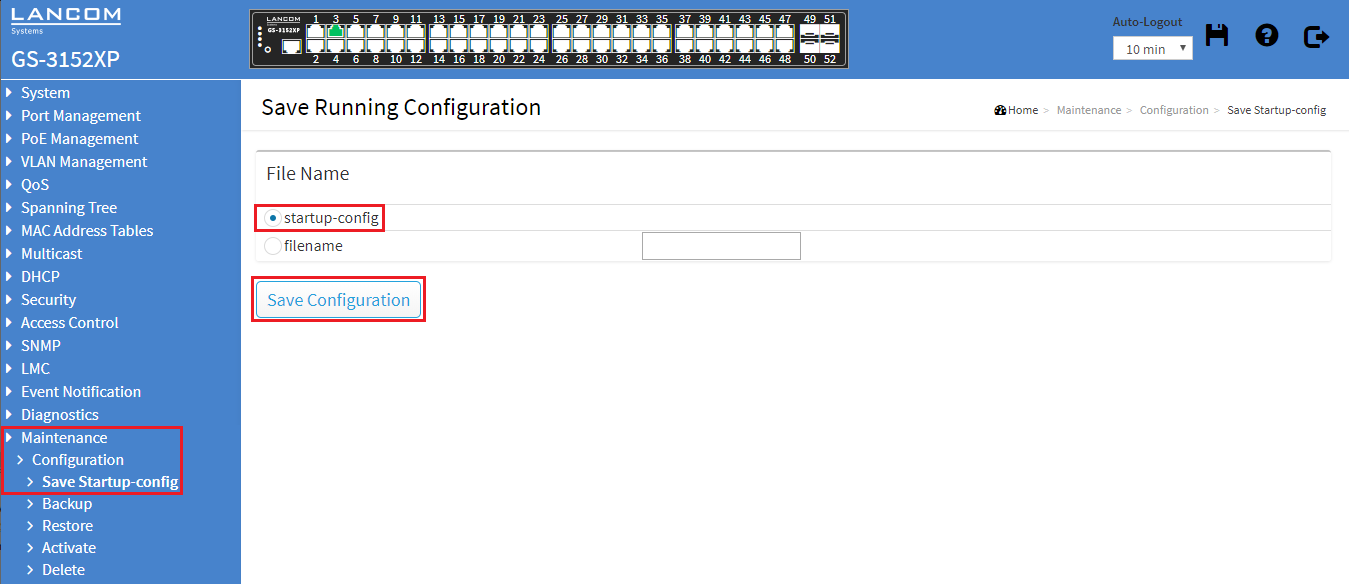
5) Change to the menu Maintenance → Configuration → Save Startup-config. Under File name, select the startup-config item and click on Save Configuration to set this configuration as the start configuration.
Important:
After restarting the switch, the start configuration is always loaded. If none is available, the default configuration will be loaded and the switch starts in its factory state.