Description:
Damit nur bestimmte Netzwerk-Teilnehmer Zugang zu einem Netzwerk erhalten, ist es sinnvoll auf dem verwendeten Switch eine RADIUS-Authentifizierung durchzuführen. Wenn ein Netzwerk-Teilnehmer sich selbst nicht per RADIUS anmelden und somit nicht als RADIUS-Supplicant dienen kann, besteht alternativ die Möglichkeit den Netzwerk-Teilnehmer anhand seiner MAC-Adresse zu authentifizieren. Bei einem Switch der XS-Serie wird es sich dabei aufgrund der SFP-Ports in der Regel um andere Netzwerk-Komponenten wie weitere Switches handeln, obschon eine Authentifizierung von Endgeräten an den Ethernet-Ports möglich ist.
In diesem Artikel wird beschrieben, wie für ein Netzwerk-Gerät eine MAC-Adress-Authentifizierung auf einem Switch der XS-Serie eingerichtet wird, damit nur dieses Zugriff zum Netzwerk erhält.
Requirements:
- LANCOM router as RADIUS server
- XS series switch with LCOS SX as of version 5.10 Rel (download latest version)
- LCOS as of version 10.30 on the router, which serves as the RADIUS server (download latest version)
- LANtools as of version 10.30 (download latest version)
- Any web browser for accessing the webinterface of the XS series switch
Scenario:
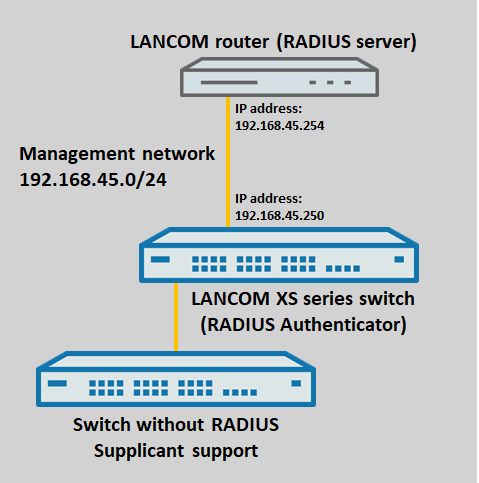
A switch without RADIUS supplicant support is connected to an XS series switch.
Ein Switch, der selber nicht als RADIUS-Supplicant fungieren kann, wird an einen Switch der XS-Serie angeschlossen. Dabei soll sichergestellt werden, dass nur der Switch direkt an den Switch der XS-Serie angebunden werden kann und keine anderen Netzwerk-Geräte stattdessen angeschlossen werden und über den Port kommunizieren können. Die Authentifizierung erfolgt daher anhand der MAC-Adresse. Dadurch sind keine zusätzlichen Konfigurationsschritte auf dem Switch ohne RADIUS-Supplicant-Unterstützung erforderlich.
Vorgehensweise:
1) Configuring the RADIUS server on the LANCOM router:
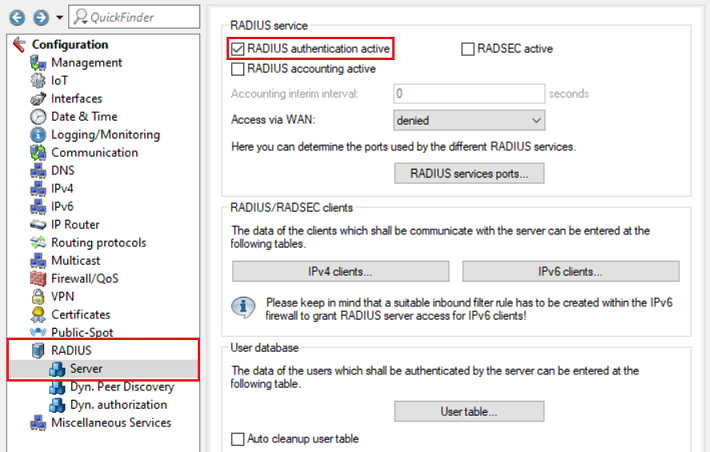
1.1) In LANconfig, open the configuration for the router, navigate to the menu RADIUS → Server and set a checkmark next to RADIUS authentication active.
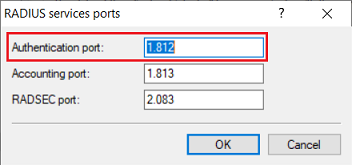
1.2) Navigate to the menu RADIUS services ports.
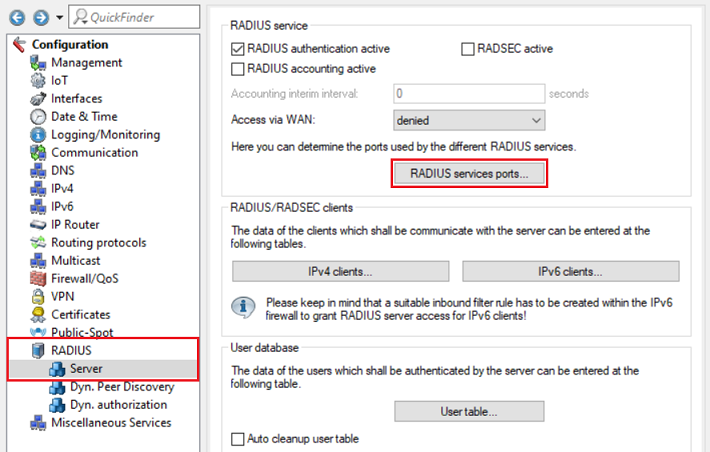
1.3) Check that the authentication port is set to 1812.
1.4) Go to the menu IPv4 clients.
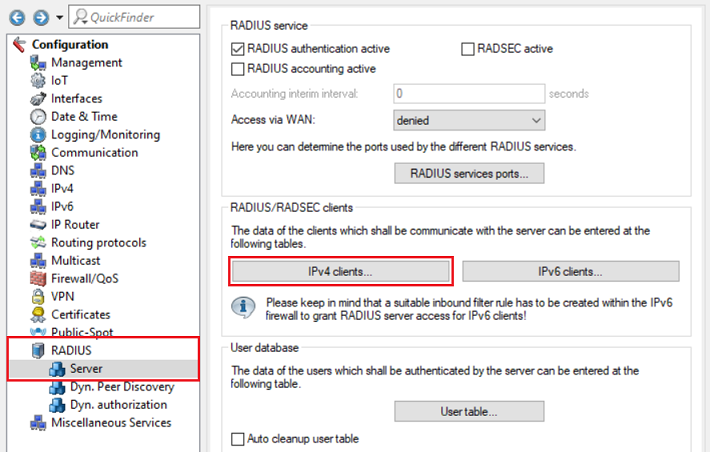
1.5) Create a new entry and enter the following parameters:
- IP address: Enter the XS series switch IP address so that it can authenticate itself as the RADIUS authenticator at the RADIUS server.
- Netmask: Enter the netmask 255.255.255.255. This stands for a single IP address.
- Protocols: Check that the protocol is set to RADIUS.
- Client secret: Enter a password that the XS series switch uses to authenticate itself at the RADIUS server. This is entered on the switch in step 2.8.

1.6) Go to the menu User table.
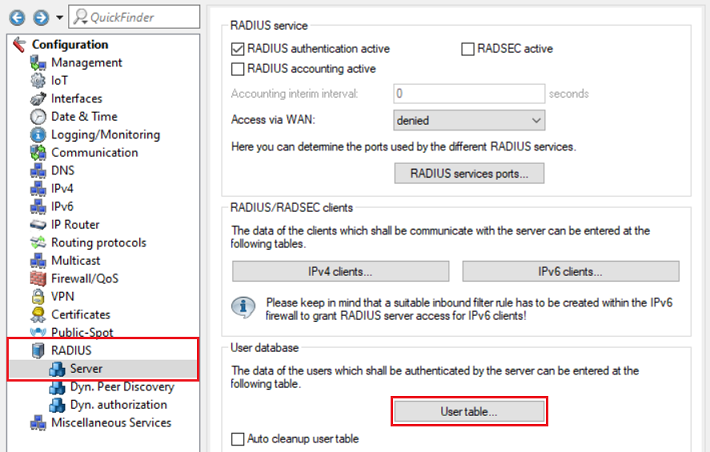
1.7) Create a new entry and adjust the following parameters:
- Name / MAC address: Tragen Sie die MAC-Adresse des Netzwerk-Gerätes, welches anhand seiner MAC-Adresse authentifiziert werden soll, in Großbuchstaben im Format 00:A0:57:12:34:56 ein.
- Password: Tragen Sie die MAC-Adresse des Netzwerk-Gerätes analog zu dem Parameter Name / MAC-Adresse ein.
- Service type: From the drop-down menu, select Call check.
- Expiry type: From the drop-down menu, select Never so that the user account remains permanently valid.
The Service type Call check is supported as of LCOS 10.30.

1.8) This concludes the configuration of the RADIUS server on the LANCOM router. You can now write the configuration back to the device.
2) Configuring the RADIUS Authenticator on the switch:
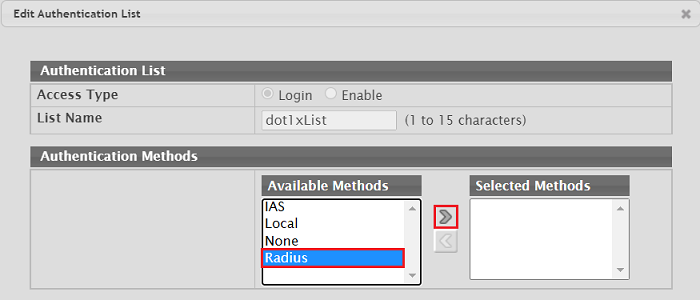
2.1) Connect to the webinterface of the device and go to the menu System → AAA → Authentication List.

2.2) Select the entry dot1xList and click Edit.
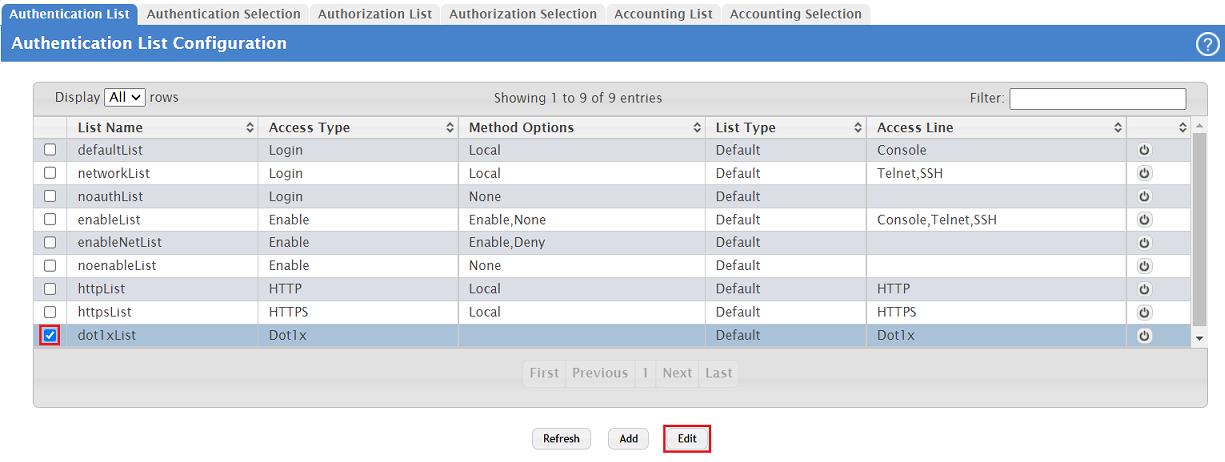
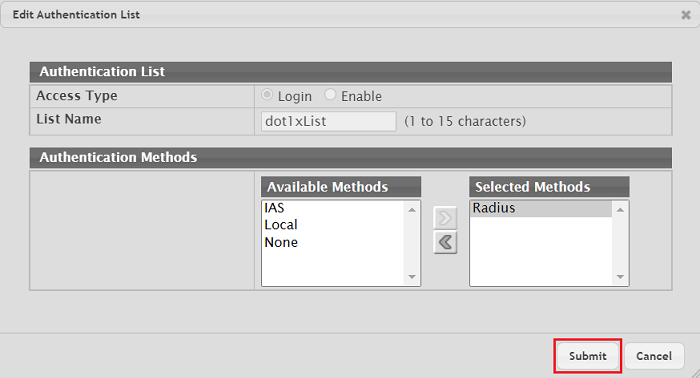
2.3) Under the Available Methods select the option Radius and click on the upper arrow symbol, so that it is applied to the Selected Methods. Click Submit afterwards.
The application of the option RADIUS is mandatory, as otherwise the switch won't forward the RADIUS requests to the RADIUS server.
2.4) Change to the menu Security → Port Access Control → Configuration.

2.5) For Admin Mode select the option Enable and click Submit.

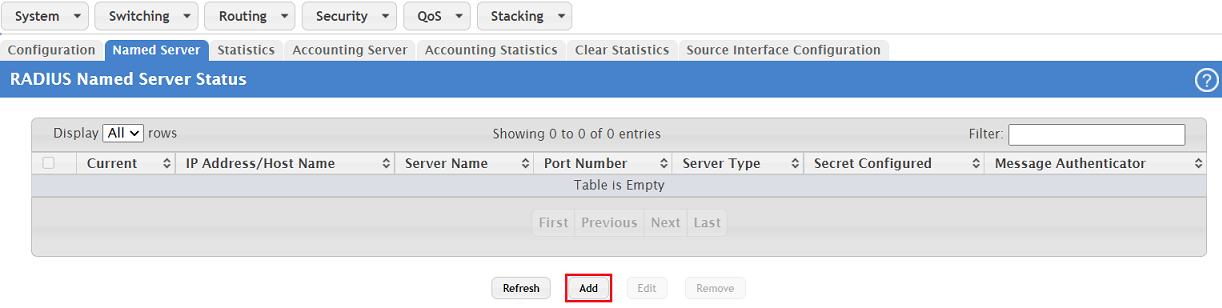
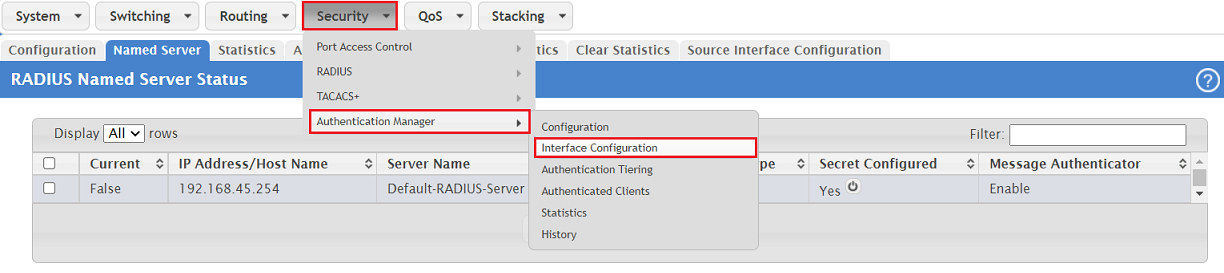
2.6) Go to the menu Security → RADIUS → Named Server.

2.7) Click Add to enter parameters for a RADIUS server.
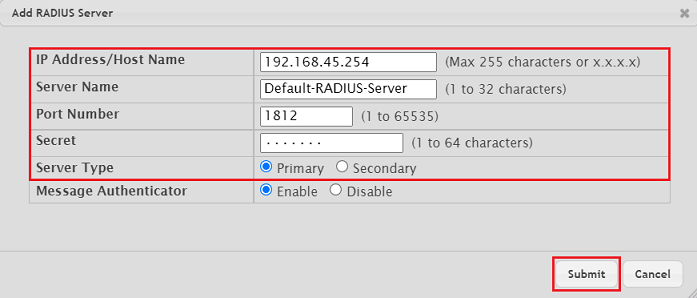
2.8) Modify the following parameters and click Submit:
- IP Address/Host Name: Enter an IP address or the hostname of the RADIUS server which is to be used for the authentication.
- Server Name: Optionally you can edit the group name for the RADIUS server (in this example the name remains on the default setting Default-RADIUS-Server).
- Port Number: Leave the RADIUS port on the default value 1812.
- Secret: Enter the Client Secret set in step 1.5.
- Server Type: Select the option Primary.
The status of the Named Server under Current has to change to True, so that the RADIUS requests are forwardede to the RADIUS server.

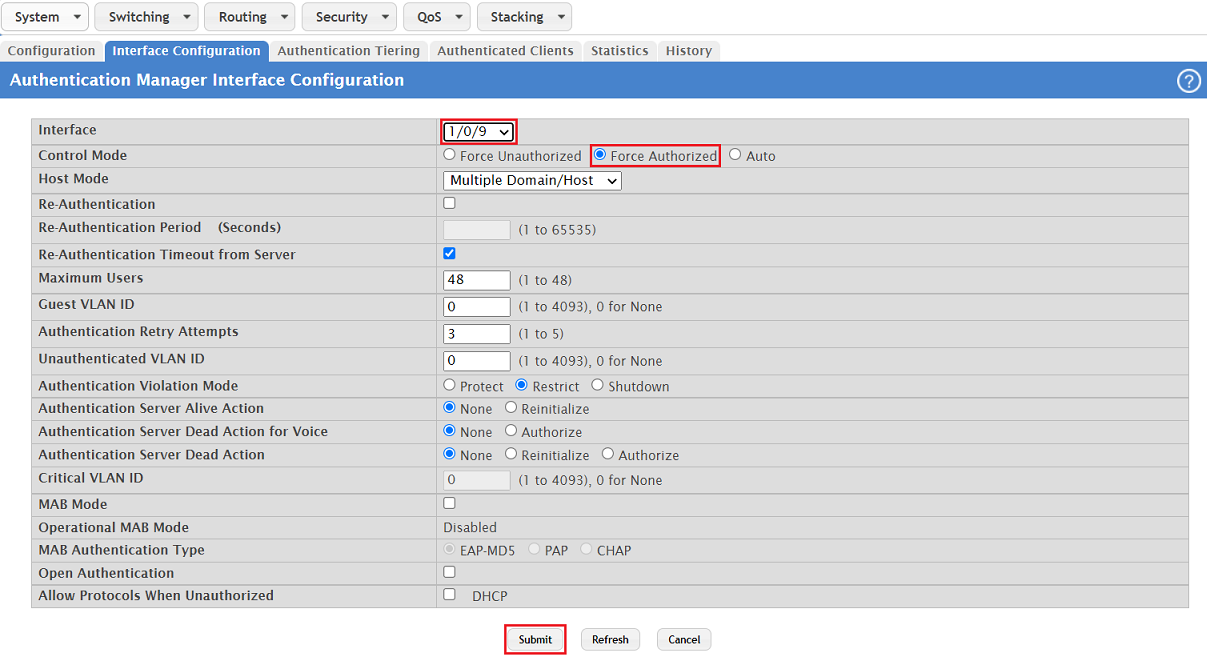
2.9) Go to the menu Security → Authentication Manager → Interface Configuration.
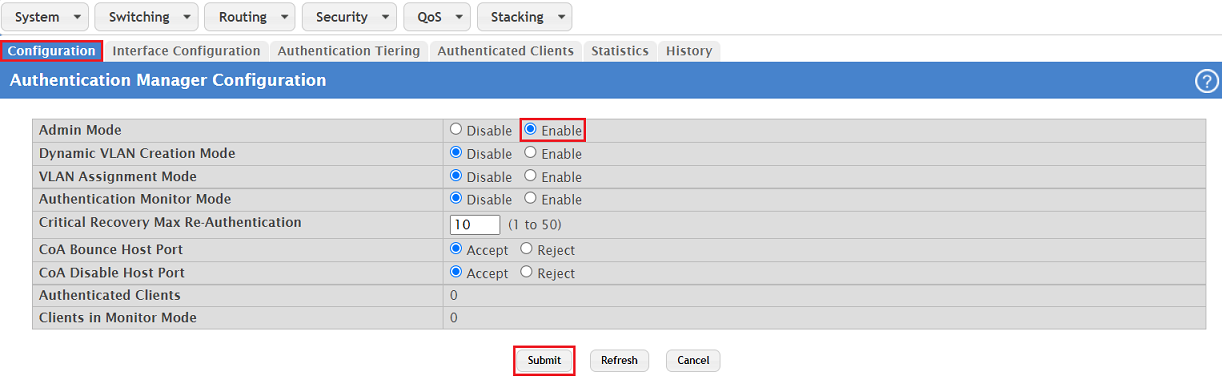
Under no circumstances should the Admin Mode be activated (Enable) at this point in the menu Security → Authentication Manager → Configuration, as the authentication is activated globally for all ports. Otherwise configuration access to the switch won't be possible anymore!
2.10) Select the interface used for configuration access (in this example the port 1/0/9), for Control Mode select the option Force Authorized and click Submit. With this setting no authentication is performed on thhis port.
Set the option Force Authorized on all ports where no authentication is to be used.
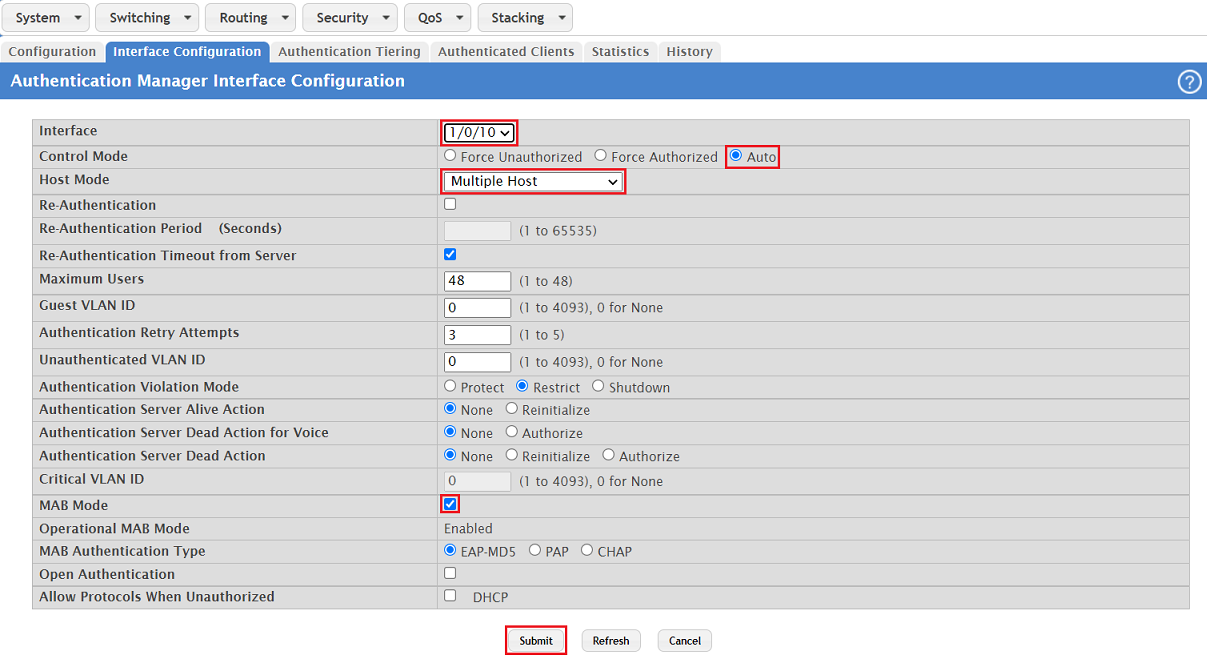
2.11) Select a port to be authenticated (in this example 1/0/10), modify the following parameters and click Submit:
- Make sure, that the option Auto is selected for the Control Mode. Thereby no communication is possible via this port until the connected network particapant has authenticated itself.
- For the Host Mode select the authentication method Multiple Host. Thereby only onbe network participant has to athenticate itself. Then all other participants can also communicate via this port.
- Activate the MAB Mode (MAC-based Authentication Bypass). Instead of username and password the MAC address is used for authentication.
2.12) Go to the tab Configuration, select the option Enable for the Admin Mode and click Submit.
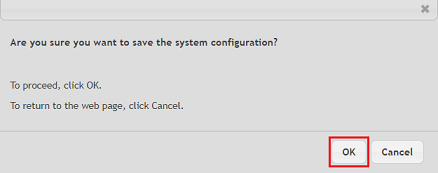
2.13) Click on Save Configuration in the top right-hand corner to save the configuration as the start configuration.
The start configuration is retained even if the device is restarted or there is a power failure.
As an alternative you can also save the configuration as start configuration via the CLI with the command write memory.

2.14) Acknowledge the save process by clicking OK.