
Description:
This document shows you how to set up an AutoWDS network by means of preconfigured integration. Configuration in this way uses the automatic topology management of a LANCOM WLC.
For further information on the AutoWDS feature, see the corresponding section in the LCOS Reference Manual .
AutoWDS is not supported anymore as of LCOS 10.70. The functionality still remeins intact in LANCOM devices (except in 18xx series routers) and therefore still can be used for existing installations. However LANCOM Systems will not provide any support regarding the configuration and troubleshooting of an AutoWDS scenario.
Requirements:
- LCOS as of version 9 (download latest version)
- LANtools as of version 9 (download latest version)
- LANCOM WLAN controller or LANCOM router with WLC Basic option
Procedures:
1) Configuration steps on the LANCOM WLC:
1.1) In LANconfig, open the configuration dialog for the WLC and switch to menu item WLAN Controller → Profiles → Advanced Profiles → AutoWDS.
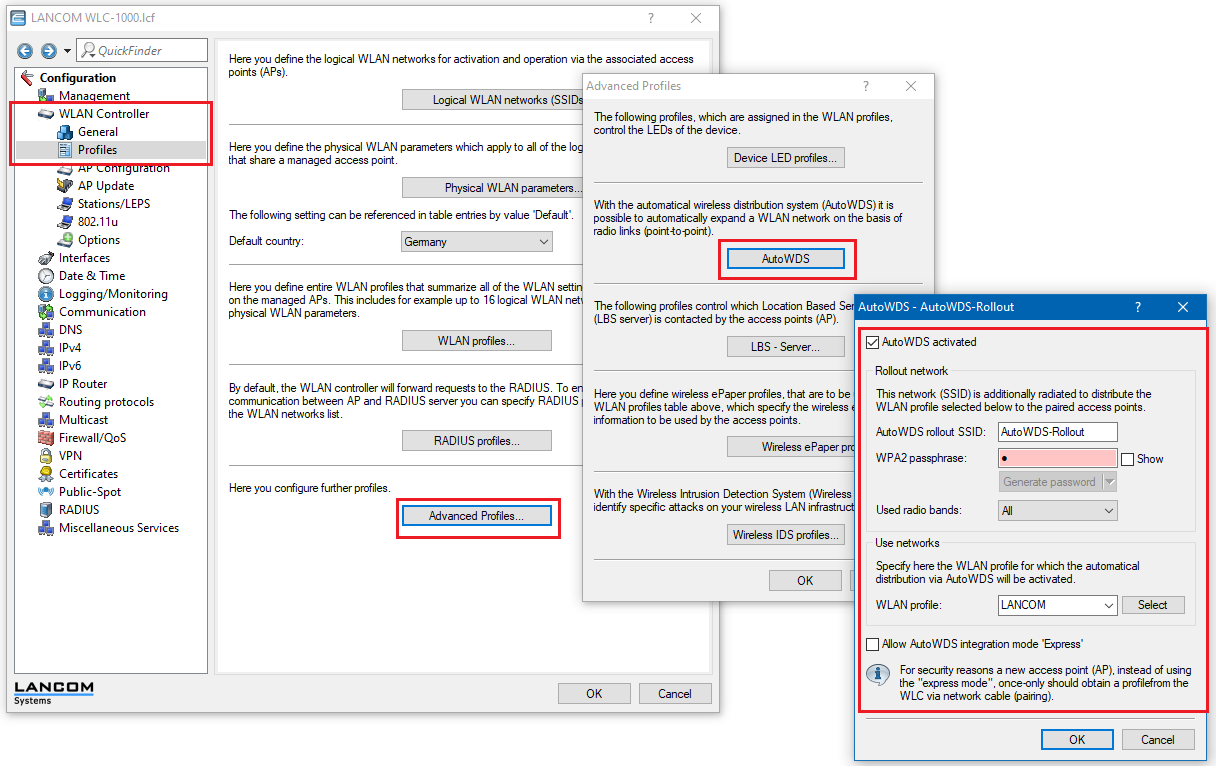
1.2) Click on AutoWDS activated to enable the feature on the device in general.
1.3) Enter the name of the AutoWDS base network under AutoWDS-Rollout-SSID. By default LANconfig uses the identifier AutoWDS-Rollout.
- The SSID specified here acts as the management network for all access points searching for the AutoWDS network and, apart from the WPA2 passphrase, it offers no further options for configuration.
- The WLC internally connects the specified SSID automatically using a WLC tunnel (WLC-TUNNEL-AUTOWDS). Normal WLAN clients are unable to use this management network.
In this case, enter a custom AutoWDS rollout SSID that is different from the LANconfig default.
1.4) Under WPA2 passphrase you enter a key to secure the AutoWDS base network.
- Select the most complex key possible, with at least 8 and a maximum of 63 characters. The key requires at least 32 characters to provide encryption of suitable strength.
1.5) Under Used radio bands specify the frequency band used by the access points for the AutoWDS base network.
1.6) Select the WLAN profile with the SSID which is to be enhanced with AutoWDS.
- The access points with this WLAN profile serve as anchor access points and support the AutoWDS base network. At the same time, associated access points receive this WLAN profile via AutoWDS as a default configuration, which they use to transmit the corresponding SSID after successful configuration.
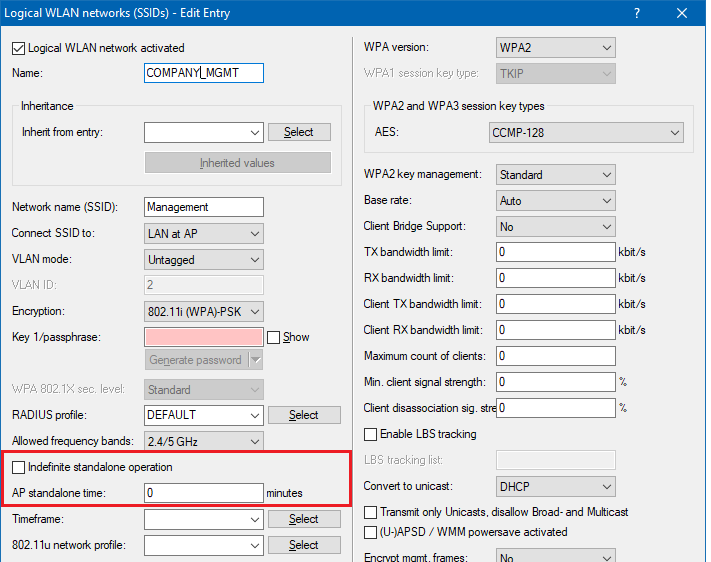
1.7) Switch to the menu WLAN Controller → Profiles → Logical WLAN networks (SSIDs).
For all SSIDs that the access point connected via AutoWDS is to broadcast later (all SSIDs specified in the WLAN profile), set the value "AP standalone time" to "0" and deactivate the option "Indefinite autonomous operation".
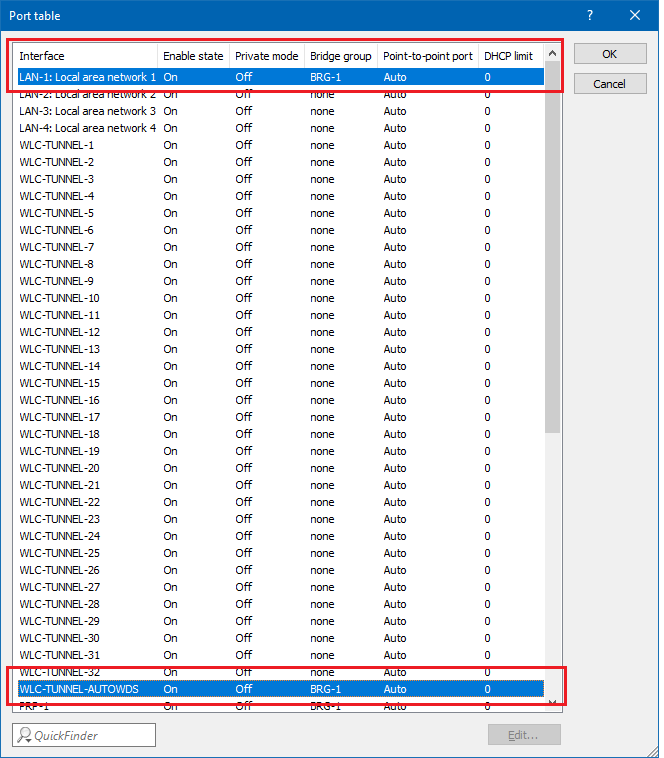
1.8) Navigate to the menu Interfaces → LAN → Port table.
1.9) Make sure that the WLC tunnel with the name WLC-TUNNEL-AUTOWDS is located in the same bridge group as the logical interface of your local network.
- In the example below, logical interface LAN-1 and the WLC tunnel WLC-TUNNEL-AUTOWDS are combined in bridge group BRG-1.
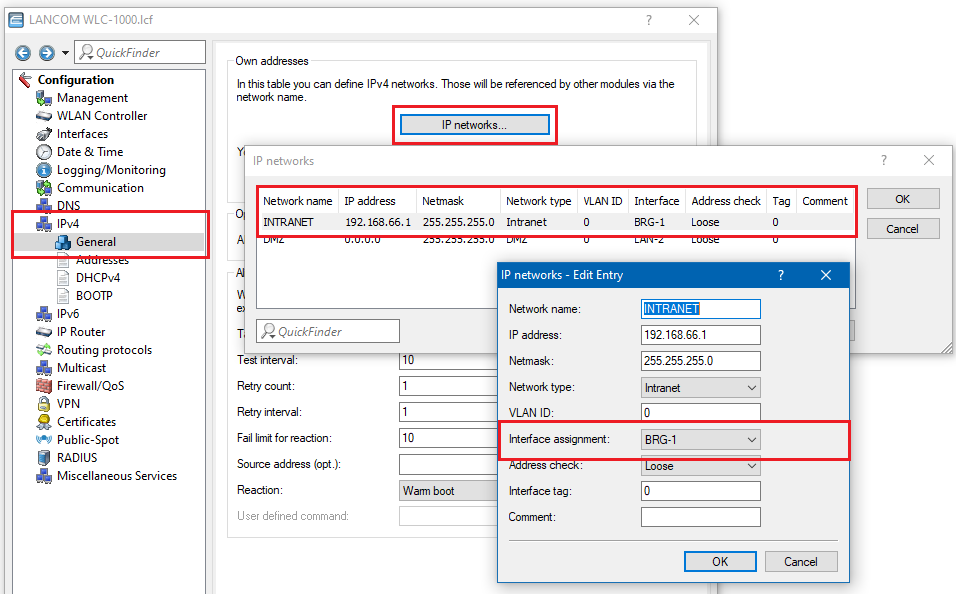
1.10) Switch to the menu IPv4 → General → IP networks.
1.11) In Interfaces assignment assign the bridge group that combines the logical interface(s) of your local network and the WLC tunnel WLC-TUNNEL-AUTOWDS (in this example BRG-1) to your local network.
1.12) Close the dialog window with OK and save the configuration to the device.
2) Configuring the LANCOM access points:
The following instructions describe the AutoWDS configuration of a LANCOM access point for preconfigured integration. The configuration steps are identical for all access points that are to be added.
If devices are out of range of the WLC, thus making pairing impossible, the SSID and passphrase can optionally be entered manually.
2.1) Open the configuration dialog of the access point in LANconfig and click Wireless LAN → AutoWDS.
2.2) Click AutoWDS activated to enable the feature on the device in general.
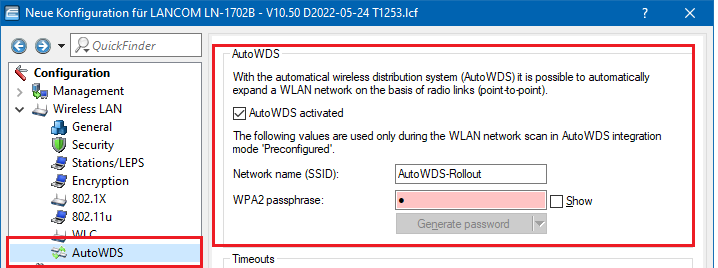
2.3) Under Network name (SSID) enter the name of the AutoWDS base network that you configured on the LANCOM WLC.
2.4) Enter the key for the AutoWDS base network under WPA2 passphrase that you have configured on the WLC.
2.5) Change the Timeout values for the Time till search mode 'Preconfig' to 1 and for the Time until search mode 'Express' to 0.
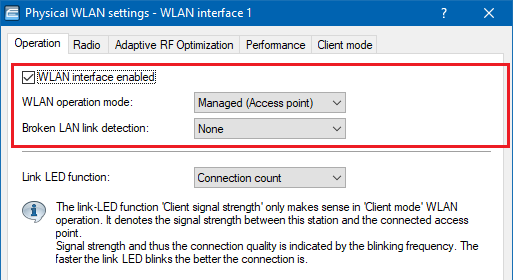
2.6) Under Wireless LAN → General → Physical WLAN Settings, make sure that at least one physical WLAN interface is in Managed mode. Otherwise the device will never search for an AutoWDS base network.
2.7) Close the dialog window with OK and save the configuration to the device.
After a successful configuration update, the access point switches its physical WLAN interface(s) into client mode and searches for the specified AutoWDS base network.