
Description:
In many cases the bandwidth of a single DSL connection will not meet your needs. If the provider has no way of increasing the speed of the DSL connection, additional Internet connections will be required. To optimize data transmission, it is possible to bundle two or more DSL connections by means of MLPPPoE (Multilink PPPoE).
This document describes the channel bundling of multiple DSL lines by employing MLPPPoE in LANCOM routers.
MLPPPoE is used to bundle multiple DSL connections to a single provider. For example, two DSL 6000 connections can be bundled to form a (fictitious) DSL 12000 connection. This can be done by combining the integrated ADSL/VDSL modem with external DSL modems connected at the Ethernet ports.
Although DSL connections of different speeds can be bundled, each line is forced to operate at the speed of the slowest connection. Bundling a DSL 6000 and a DSL 2000 connection would only result in the bandwidth of a single DSL 4000 connection.
MLPPPoE is significantly different from the load balancing technology used in LANCOM routers. The load balancer, which combines the lines into a single remote site, distributes the load statistically. A session is randomly distributed to one of the lines defined in the load balancer. However, each session can only use the maximum throughput available on the respective target line. Using MLPPPOE, on the other hand, different lines are combined into a single entity, which provides the overall capacity of all of the lines.
- LCOS as of Version 7.80 (download latest version)
- LANtools as of Version 7.80 (download latest version)
- A provider that supports MLPPPoE .
- All DSL lines are from the same provider.
Scenario:
1) Using a router with an integrated ADSL/VDSL modem:
- Two external modems and the internal DSL modem are to be operated with MLPPPoE channel bundling.
- Three DSL 16000 connections are available.
2) Using a router without an integrated ADSL/VDSL modem:
- Three external DSL modems are to operate with MLPPPoE channel bundling.
- Three DSL 16000 connections are available.
Procedure:
1) Using a router with an integrated ADSL/VDSL modem:
You only need to set up one Internet connection as your provider gives you just one user name and password for MLPPPoE .
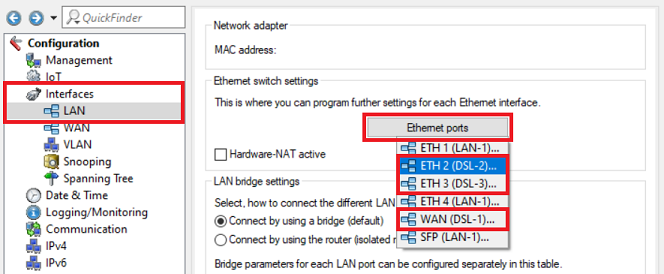
1.2) Open the configuration for the router in LANconfig and switch to the menu item Interfaces → LAN → Ethernet ports .
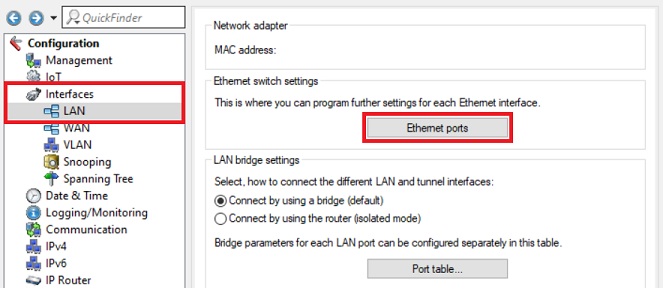
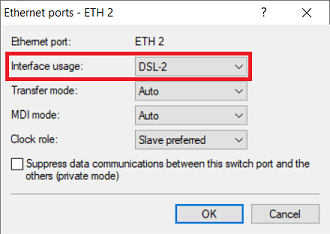
1.3) Assign one DSL port each to two Ethernet ports so that the two external DSL modems can be connected to them (in this example, the interface DSL-1 is assigned to the port ETH1 and the interface DSL-2 is assigned to the port ETH2).

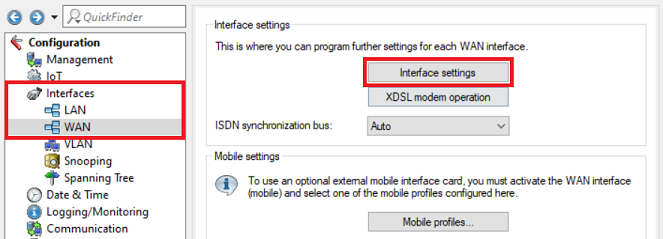
1.4) Navigate to the menu Interfaces → WAN → Interface settings .
1.5) Adjust the interface settings for the DSL interfaces assigned in step 1.3 as follows:
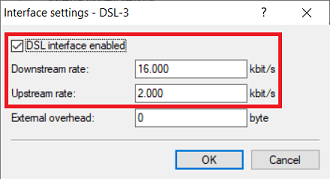
Interface settings - DSL-1:
- Make sure the checkmark is set for DSL interface enabled .
- Downstream rate: Set the download bandwidth of the Internet connection.
- Upstream rate: Set the upload bandwidth of the Internet connection.

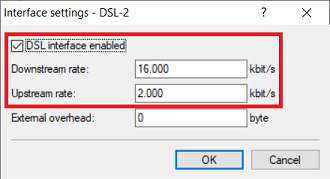
Interface settings - DSL-2:
- Set a checkmark for DSL interface enabled .
- Downstream rate: Set the download bandwidth of the Internet connection.
- Upstream rate : Set the upload bandwidth of the Internet connection.

1.7) Edit the communication layer created by the Setup Wizard in step 1.1 (in this example the layer INTERNET) and adjust the following parameter:
- Options: From the drop-down menu, select Channel bundling .
A VDSL connection will also work with these settings ( Encapsulation = LLC-MUX and Layer-1 = ADSL), because they are ignored when operating VDSL.

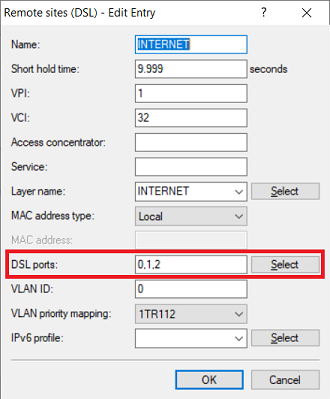
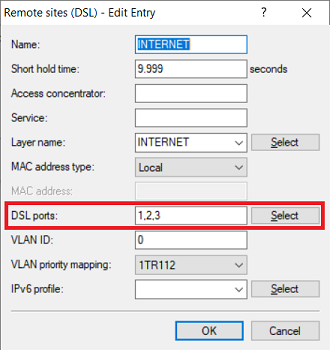
1.8) Switch to the menu Communication → Remote sites → Remote sites (DSL).
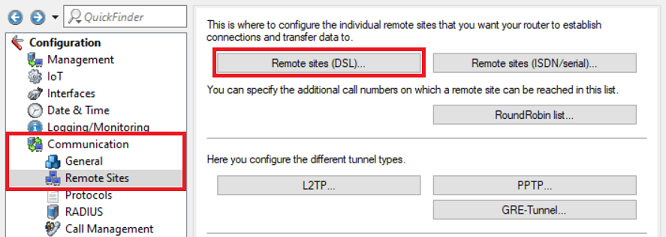
1.9) Edit the remote site created by the Setup Wizard in step 1.1 (in this example the layer INTERNET) and adjust the following parameter:
- DSL ports : Set the DSL interfaces used by the integrated DSL modem (in this case 0) and by the external DSL modems (see step 1.3).
1.10) This concludes the configuration. Write the configuration back to the router.
2) Using a router without an integrated ADSL/VDSL modem:
The settings described in the following differ from those in scenario 1.
2.1) Use the Setup Internet access wizard to install the Internet connection.
You only need to set up one Internet connection as your provider gives you just one user name and password for MLPPPoE .
2.2) In the menu Interfaces → LAN → Ethernet ports , assign one DSL interface each to three Ethernet ports.
2.3) Activate the DSL interfaces assigned in step 2.2 in the menu Interfaces → WAN → Interface settings and set the upstream and downstream rates.


2.4) In the menu Communication → General → Communication layers , adjust the layer created by the Setup Wizard in the step 2.1 (in this example the layer INTERNET):
- Options: From the drop-down menu, select Channel bundling.

2.5) In the menu Communication → Remote Sites → Remote sites (DSL), adjust the remote site created by the Setup Wizard in step 2.1 (in this example the remote site INTERNET):
- DSL ports : Set the DSL interfaces used for the external DSL modems (see step 2.3).
2.6) This concludes the configuration. Write the configuration back to the router.