What is dynamic path selection?
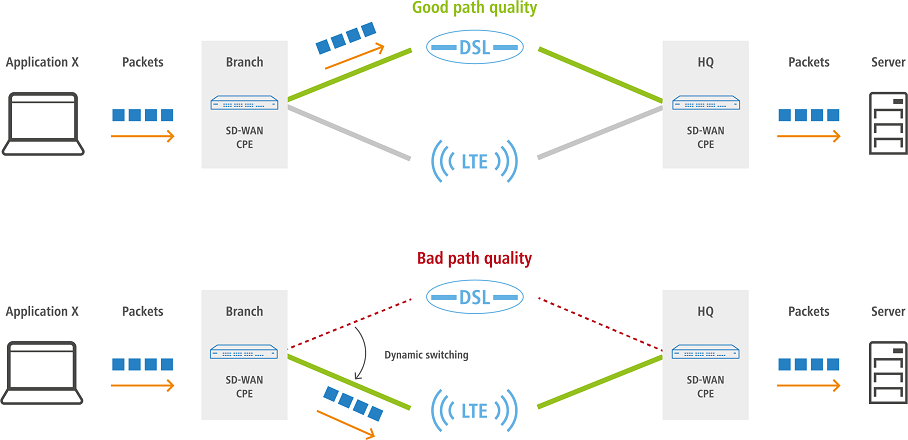
Used in an SD-WAN scenario where several lines are available, dynamic path selection (DPS) optimizes the performance of an application by directing data traffic over the line with the best quality as rated by metrics like utilization, packet loss, latency and jitter.
In SD-WAN scenarios, MPLS lines should either be replaced or supplemented by cost-effective Internet connections such as DSL, cable Internet, fiber optic or 4G/5G. Load balancing helps to make use of the total bandwidth of all of the available lines. Dynamic path selection can be used to assure the performance of mission-critical applications.
All lines are continuously, actively monitored with ICMP packets to calculate metrics for load, packet loss, latency and jitter. Policies are used to define the requirements of business applications: For example, the real-time data traffic on lines can be monitored for the tolerable packet loss or the maximum latency of a possible path.
The dynamic path selection algorithm selects the best quality line for sessions. If several lines meet the requirements, load balancing distributes the load across these lines by means of round-robin scheduling.
Dynamic path selection (DPS) is activated on a load balancer. This document describes how to configure DPS in the LANCOM Management Cloud (LMC).
Further informations are available in the following Techpaper:
Requirements
- LCOS as of version 10.42 RU1 (download latest version)
- Access to the LMC including your own project
- Two or more functional Internet connections on the gateway router, which are aggregated in the LMC to work as the load balancer .
1. Activate dynamic path selection project-wide
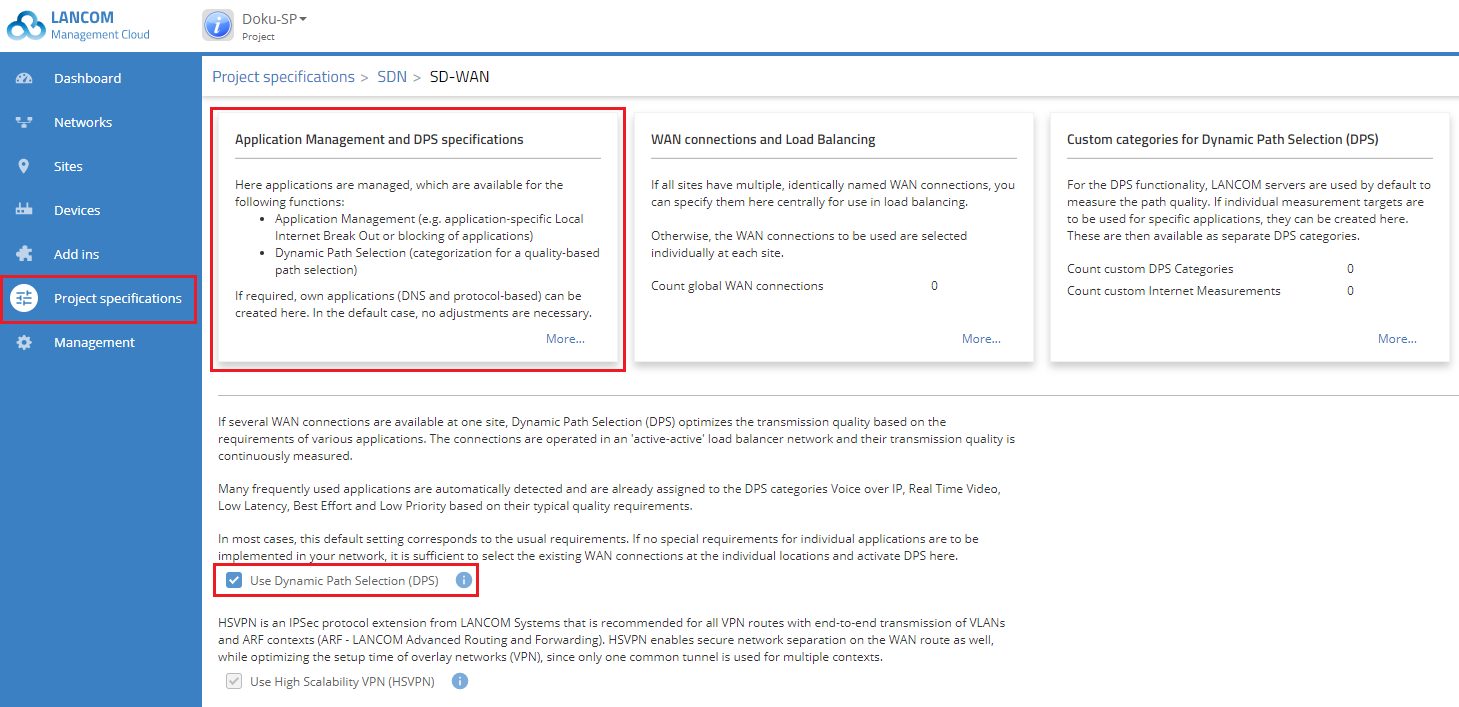
1.1. To activate dynamic path selection, you open the Project specifications menu and click the SDN tile.
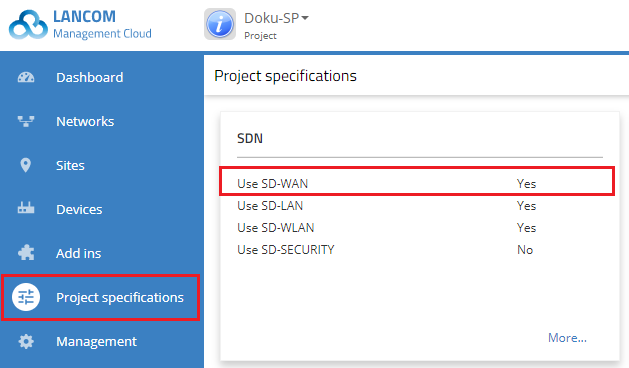
1.2. In the window that opens, select the SD-WAN tile.
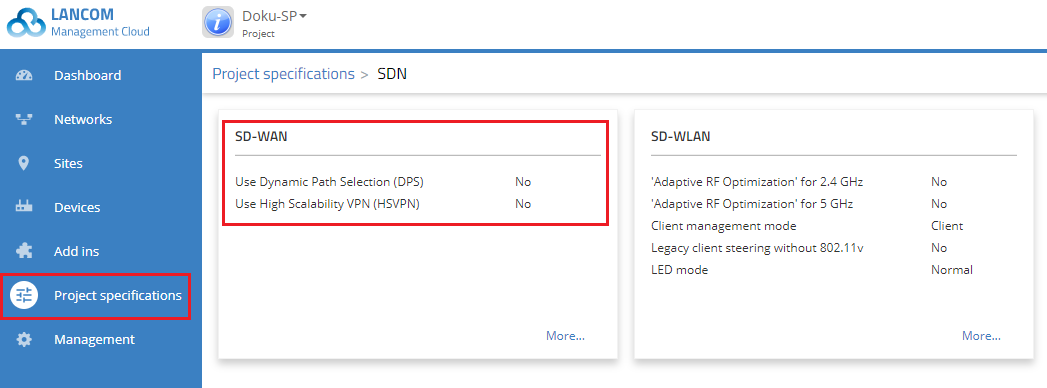
1.3. In the window that opens, select the Use Dynamic Path Selection (DPS) option and click Save.
By default, the configuration contains preset categories and definitions for the most common applications and protocols, so you can operate DPS after activating it and rolling it out to the devices in your project.
However, you can also create your own categories and definitions for applications and protocols by clicking on the relevant tile in the header of the SD-WAN page (see section "Creating your own DPS specifications").
1.4. The change now needs to be rolled out to the devices in your project by means of the Devices menu.
- Select all of the devices with a configuration marked as “Outdated” and then click Configuration roll out.
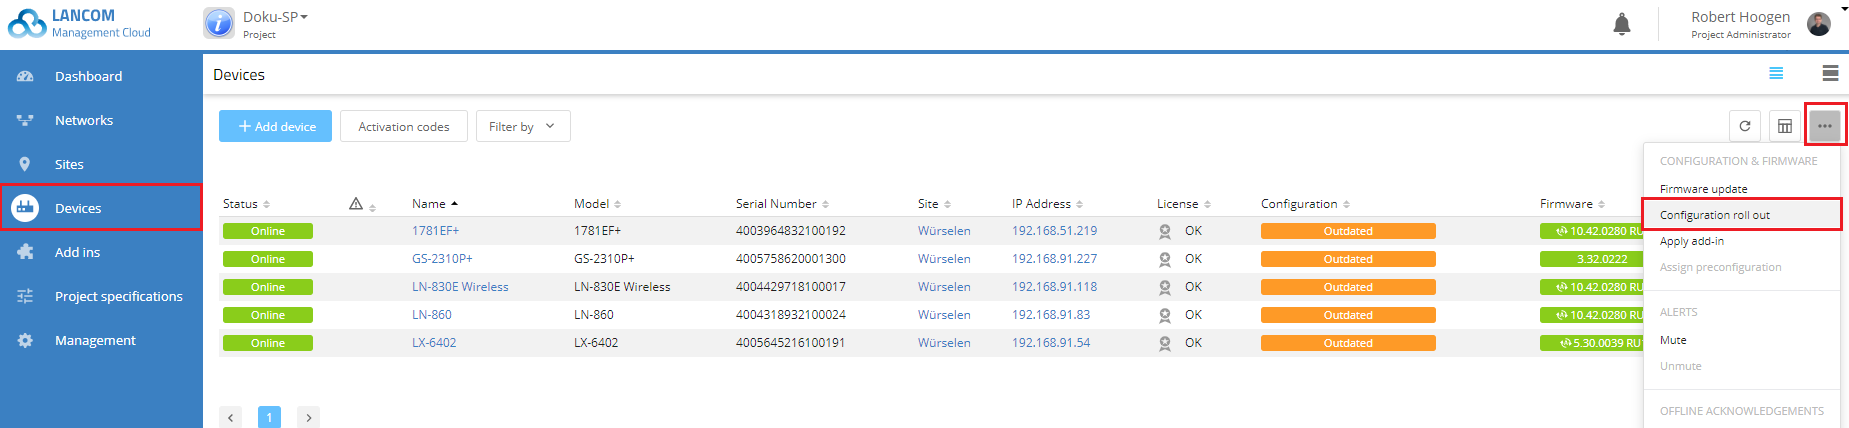
1.5. DPS is now enabled for your project.
2. Creating your own DPS specifications
If you create your own DPS specifications, you have to roll them out to the gateway router after creating them and also after every change/addition (see step 1.4).
2.1. Specifications for DNS and protocol-based applications
2.1.1. Open the SD-WAN tile (see step 1.3).
2.1.2. Then click the tile Application management and DPS specifications.
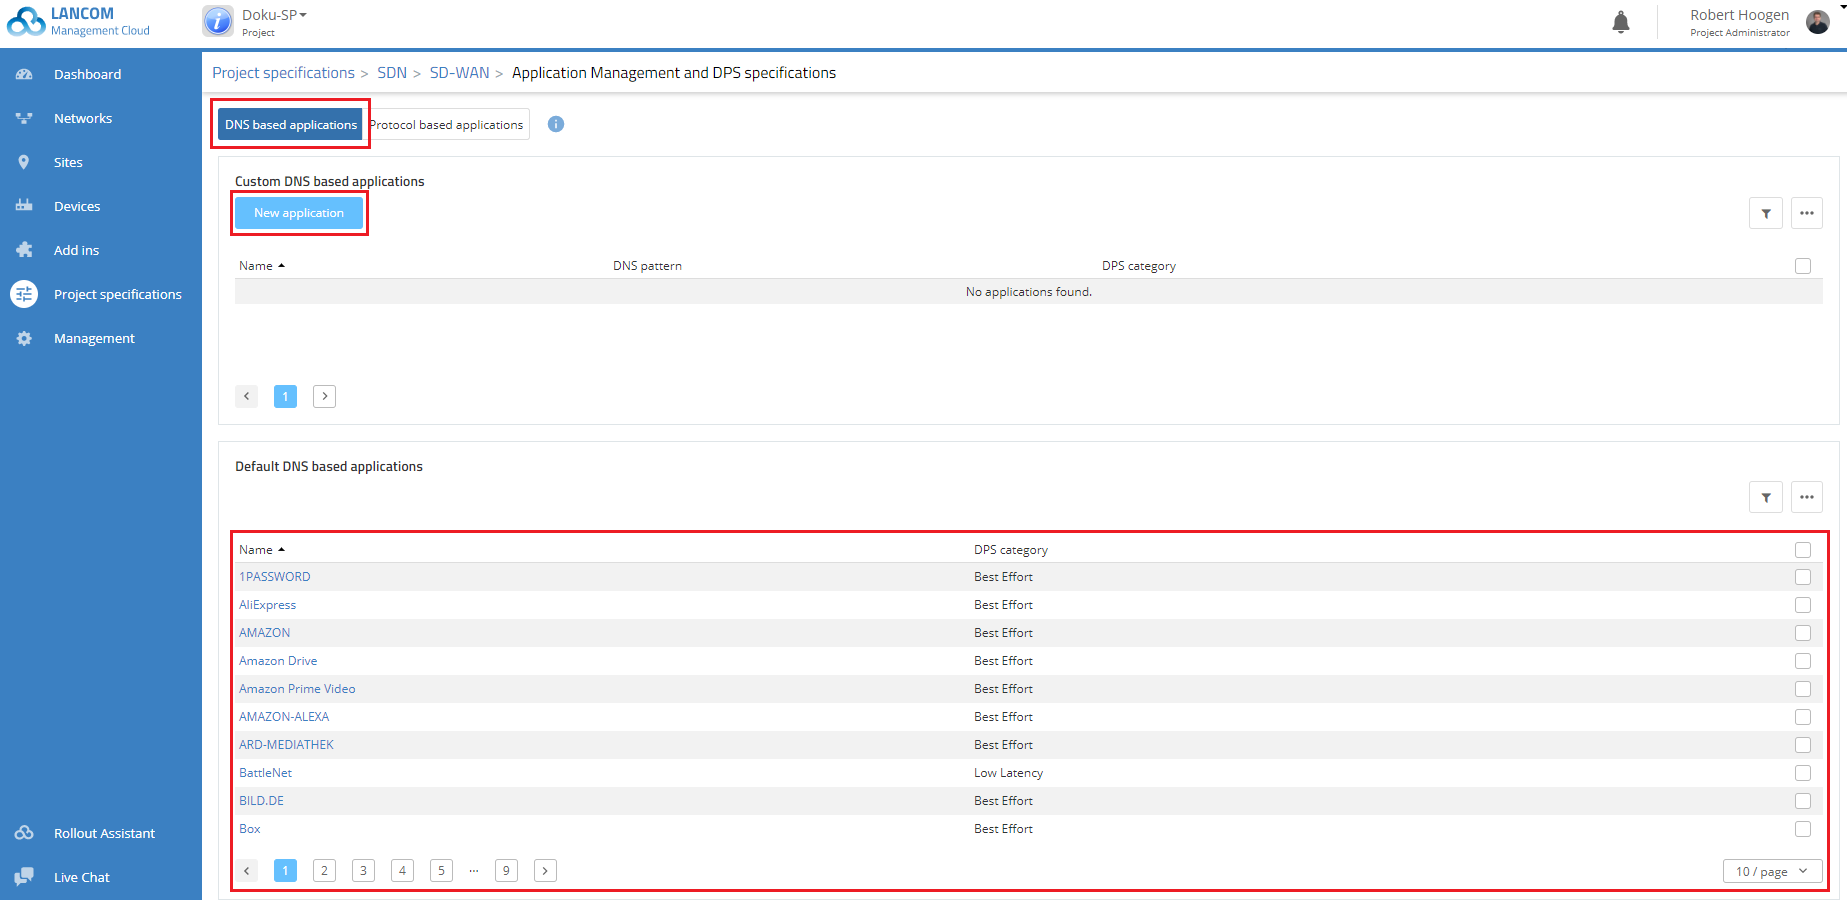
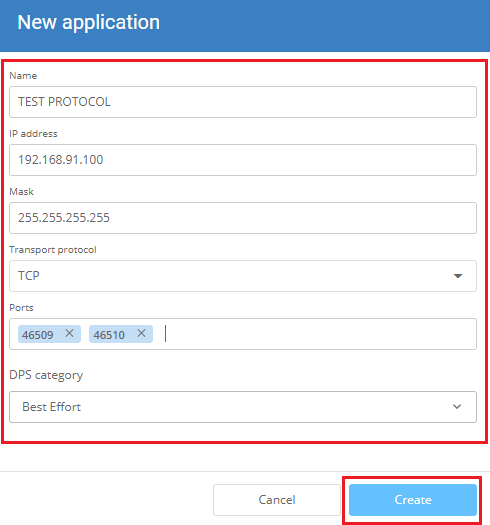
2.1.3. Click the button New application.
- Enter a name for the new application.
- You can enter one or more DNS schemas. You can use the * wildcard
- Assign the new application to a DPS category.
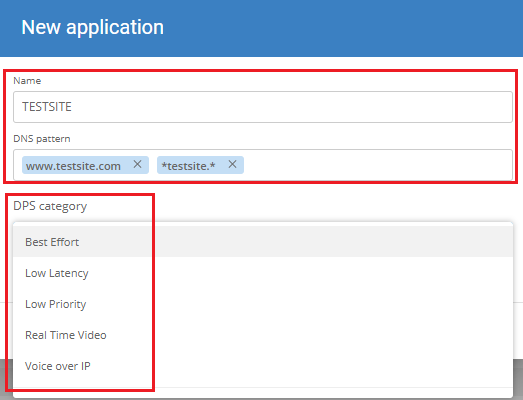
2.1.4. Save the new application. It will be shown in the list.
- For predefined applications, the only thing you can change is the DPS category.
- Proceed in the same way to define your own protocol-based applications.
2.2. Creating your own DPS categories
2.2.1. Open the SD-WAN tile (see step 1.3).
2.2.2. Then click the tile Custom categories for Dynamic Path Selection (DPS).
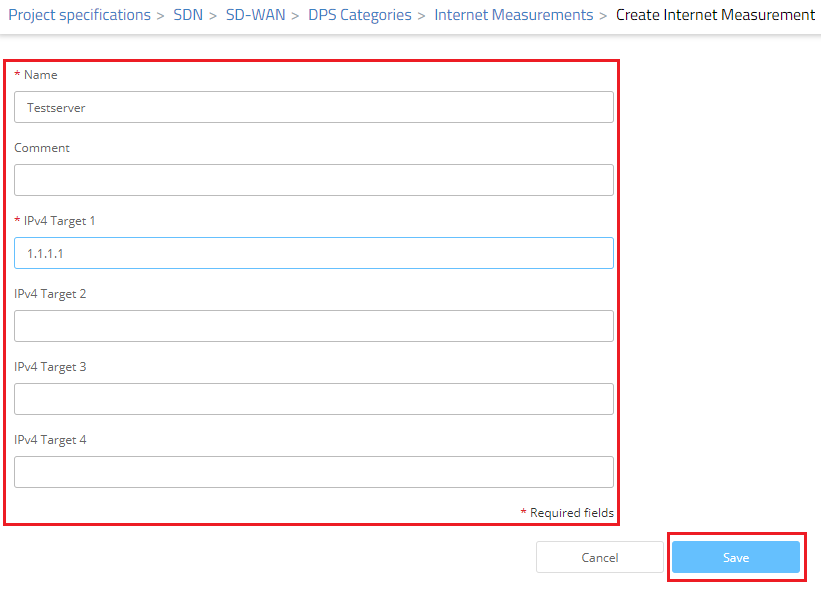
2.2.3. If not available already, you first have to define one or more Internet measurement target(s).
- To do this, click the button Internet measurements → Create Internet measurement and enter the target parameters into the dialog.
- You should only use your own DPS categories if they reflect the quality of certain applications better than the measurement servers provided by LANCOM.
- As soon as measurement targets are used in DPS categories, any managed devices can use the ICMP protocol to ping them and assess the quality of alternative paths. The values measured are packet loss, latency and jitter. These values are used by the dynamic path selection to determine the best available path for the specified applications.
- The measurement targets should be IP addresses that can be accessed reliably to determine the quality of the paths accurately.
- The measurements apply solely to the local Internet breakout. Measurements of the overlay/VPN connections are conducted automatically from end to end between the connected gateways.
2.2.4. Click on the Save button to accept your changes.
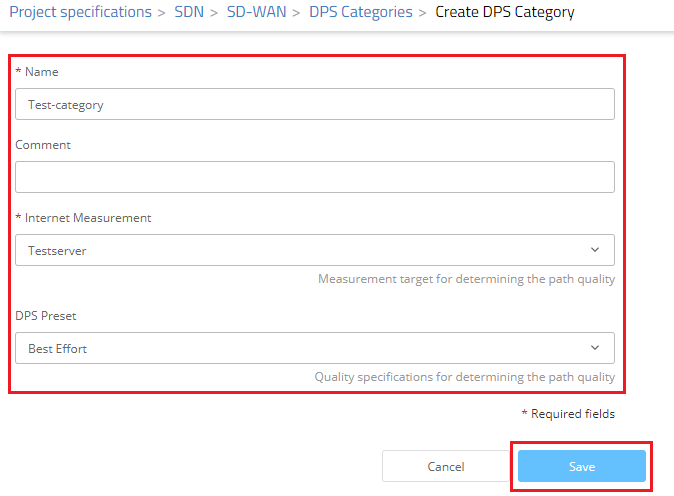
2.2.5. Then click the Create DPS category button.
- Enter a name for the new category and select the desired Internet measurement target.
- Select one of the five DPS presets and click on Save.