Description:
Due to higher bandwith or redundancy needs some scenarios require several switch ports to be combined. This can be implemented with the protocol LACP (Link Aggregation Control Protocol).
The main reason for using an LACP trunk between an LCOS LX access point and a GS-3xxx series switch is increased redundancy. However, for access points with two 2.5 GBit ports (e.g. the LX-6500) and a matching switch an LACP trunk can also lead to an increased performance with extremely high data transfer via WiFi.
This article describes how to configure an LACP trunk between a GS-3xxx series switch and an LCOS LX access point.
Please note, that LX-6500(E) access points operated with PoE in 802.3at mode limit the port speed of ETH-2 to only 100 MBit (ETH-1 - 2,5 GBit). Due to the diverging port speeds (ETH-1 - 2,5 GBit und ETH-2 - 100 MBit) LACP cannot be used in such a scenario!
LANCOM LX-6500(E): Improvements to PoE power management as of LCOS LX 6.14 in IEEE 802.3at operation
In contrast to a Static Trunk the feature LACP supports a dynamic negotiation, thus enabling the Trunk to remain active when a line fails. LANCOM Systems therefore recommends to always use LACP when combining switch ports to a trunk.
To ensure optimal redundancy, it is recommended to connect the access points via a power supply unit as well as via PoE (if PoE is supported by the switch). If the power supply unit fails, the GS-3xxx takes over the power supply via PoE. In this process the access point reboots.
Requirements:
- GS-3xxx series switch
- LCOS SX as of version 4.00 Rel or 4.20 Rel (download latest version)
- LCOS LX as of version 6.12 Rel (download latest version)
- LANtools as of version 10.80 Rel (download latest version)
- Any web browser for accessing the webinterface
Procedure:
The cables must not be connected before concluding the LACP configuration on the switch and the access point as otherwise a loop will occur!
1) Configuration steps on the switch:
1.1) Configuring LACP on the switch:
Configure LACP on the switch as described in one of the following Knowledge Base articles (select the article which matches the operating system used on your switch):
Configuring an LACP Trunk on a GS-3xxx series switch (LCOS SX 4.00)
Configuring an LACP Trunk on a GS-3xxx series switch (LCOS SX 4.20)
1.2) Setting the port speed to a maximum value:
The port speed of the switch ports used for LACP must be limited to the maximum supported speed of the access points (see step 2.2).
Skip step 1.2 in the following cases:
- If the ports on the switch as well as the ports on the access points support 2.5 GBit (e.g. the LX-6500 has two Ethernet ports with 2.5 GBit).
- If the ports on the switch support a maximum of 1 GBit.
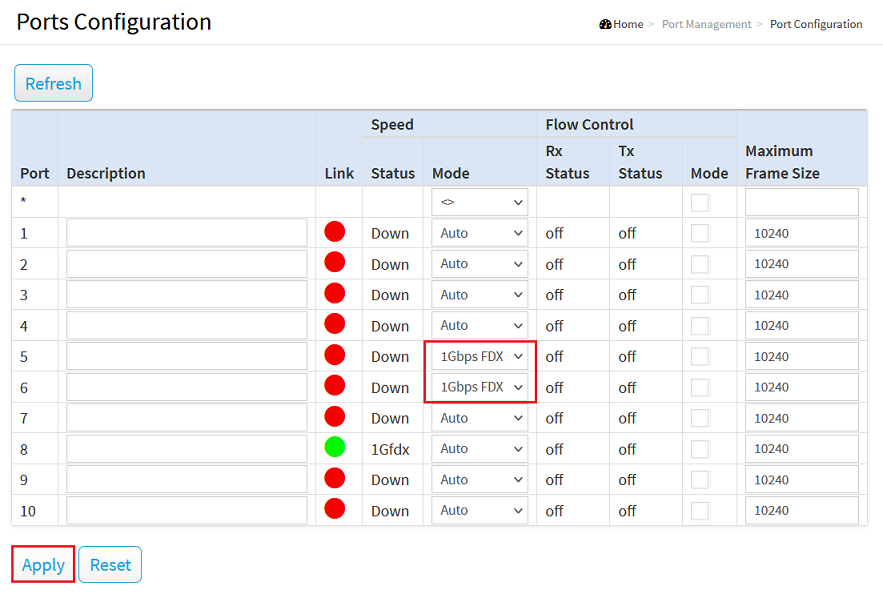
1.2.1) Connect to the webinterface of the switch and go to the menu Port Management → Port Configuration.
1.2.2) Select the ports, LACP was configured for in step 1.1 and, under Mode, select the highest port speed which is supported by both ports of the access point (see step 2.2). In this example the option 1Gbps FDX has to be selected for a port speed of 1 GBit.
1.2.3) With the configuration complete, click on the red disk symbol in the upper right corner to save the configuration as the start configuration.
The start configuration is retained even if the device is restarted or there is a power failure.

2) Configuration steps on the access point:
2.1) Configuring LACP on the access point:
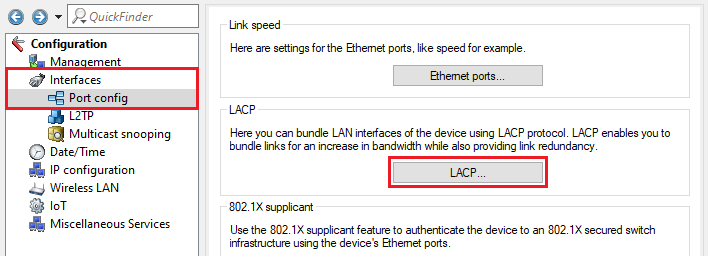
2.1.1) Go to the menu Interfaces → Port config → LACP.
2.1.2) Edit the existing entry for the Bundle-0 and for Operating select the option Yes.
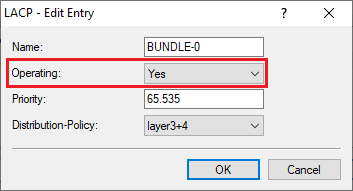
2.1.3) This concludes the configuration of LACP on the access point. Write the configuration back to the device.
2.2) Setting the port speed of both access point ports to the same value (only required on access points with different Ethernet port speeds):
As some LCOS LX access points support different port speeds (e.g. LX-6400 with ETH1: 2.5 GBit and ETH2: 1 GBit), the speed must be set to the highest value supported by both ports (for an LX-6400 this is 1 GBit).
Skip step 2.1, if you are using an access point, where both ports support 2.5 GBit and also the ports on the switch support 2.5 GBit (e.g. the LX-6500 has two Ethernet ports with 2.5 GBit).
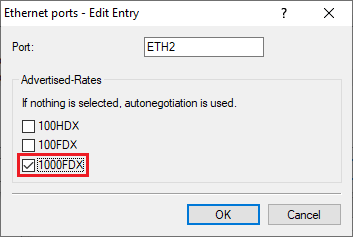
2.2.1) Connect to the access point via LANconfig and go to the menu Interfaces → Port config → Ethernet ports.
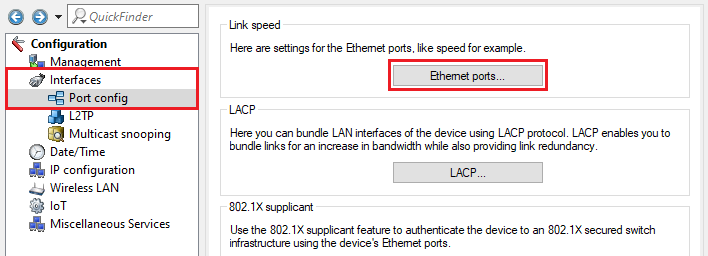
2.2.2) Edit both ports and select the option 1000FDX.