
| Seiteneigenschaften |
|---|
Description:
Dieses Dokument beschreibt, wie Sie in der This document describes how to configure a cloud-managed hotspot with the LANCOM Management Cloud (LMC) einen Cloud-managed Hotspot konfigurieren können.
In diesem Beispielszenario werden LANCOM Access Points hinter einer bestehenden Netzwerkinfrastruktur mit Komponenten anderer Hersteller eingesetzt, sodass für die Bereitstellung des Hotspots ein sogenanntes „Overlay“ zum Einsatz kommt. Die Hotspot-Datentransfer-Routen werden in diesem Fall über die bestehenden Verbindungen „drübergelegt“.
Hierbei wird das Network Address Translation (NAT)-Verfahren genutzt, um so eine sichere Trennung der Hotspot-User und -Daten von den restlichen unternehmensinternen Datenströmen zu gewährleisten. Einer der Access Points fungiert dann als sogenannter "NAT-AP", dient also als Gateway für die restlichen Access Points.
| Hinweis |
|---|
Bitte beachten Sie, dass die Routing-Performance eines Access Points in der Regel geringer ausfällt als die eines Routers. Somit kann es beispielsweise vorkommen, dass die erreichbare WLAN-Geschwindigkeit durch die Routing-Performance des Access Points limitiert wird. Es ist daher unbedingt anzuraten einen möglichst performanten Access Point als "NAT-AP" einzusetzen (LX- oder LN-Serie). |
| Info |
|---|
Der Gateway-Router sowie der verwendete Switch müssen kein VLAN unterstützen, damit dieses Szenario umgesetzt werden kann. Es kann daher auch ein unmanaged Switch verwendet werden. Dies ist besonders in Szenarien hilfreich, in denen kein Zugriff auf die Netzwerk-Infrastruktur besteht (außer auf die Access Points). Wird VLAN verwendet, muss auf dem Switch die Hotspot VLAN-ID entsprechend konfiguriert werden. |
Requirements:
- LCOS ab Version 10.42 bzw. LCOS LX ab Version 5.30 (download aktuelle Version)
- Zugang zur LANCOM Management Cloud (kostenpflichtig)
- Beliebiger Web-Browser für den Zugriff zur LANCOM Management Cloud
- Bereits in der LMC konfiguriertes und funktionsfähiges WLAN-Netzwerk
| Info |
|---|
Die im Folgenden beschriebenen Vorgehensweisen bauen auf einem funktionsfähig eingerichteten Netzwerk-Szenario auf, in welchem ausschließlich die LANCOM Access Points durch die LMC verwaltet werden. |
Scenario:
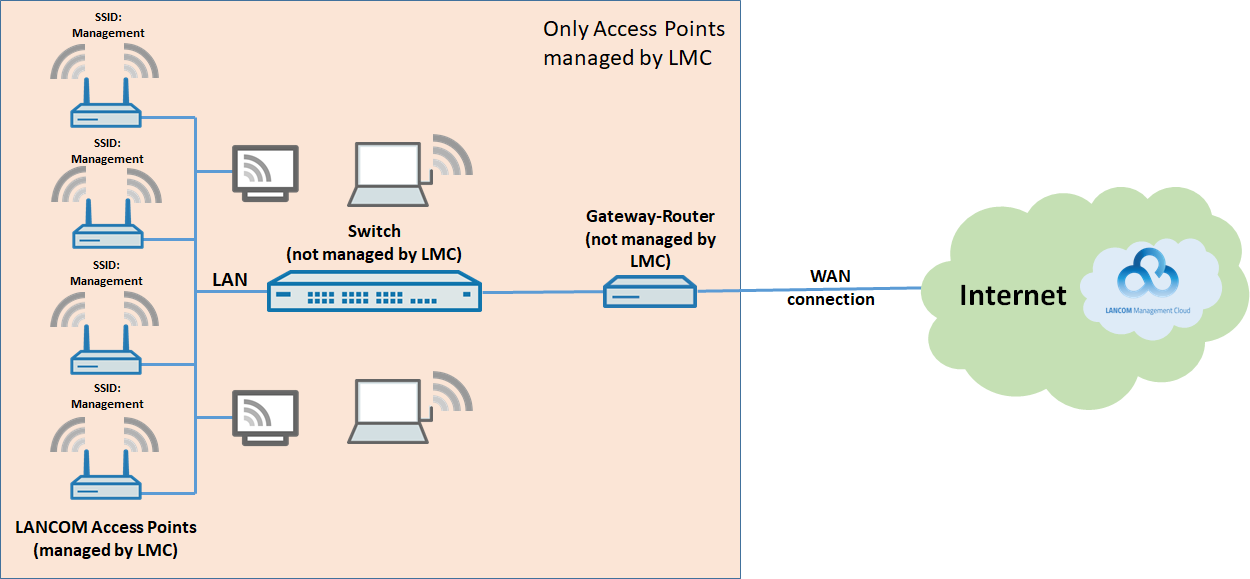
Das WLAN in einer Firma wird mit LANCOM Access Points betrieben und durch die LANCOM Management Cloud verwaltet:
- Es werden mehrere LANCOM Access Points für das WLAN verwendet, welche durch die LMC verwaltet werden.
- Weiterhin werden ein Switch und ein Router eines Fremdherstellers verwendet. Diese können daher nicht durch die LMC verwaltet werden.
- Es ist ein lokales Netzwerk konfiguriert, welches allen Mitarbeitern zur Verfügung steht.
- Die vorhandenen LANCOM Access Points strahlen ein WLAN-Netzwerk mit der SSID "Management" aus. Dieses WLAN ist von allen Mitarbeitern der Firma nutzbar.
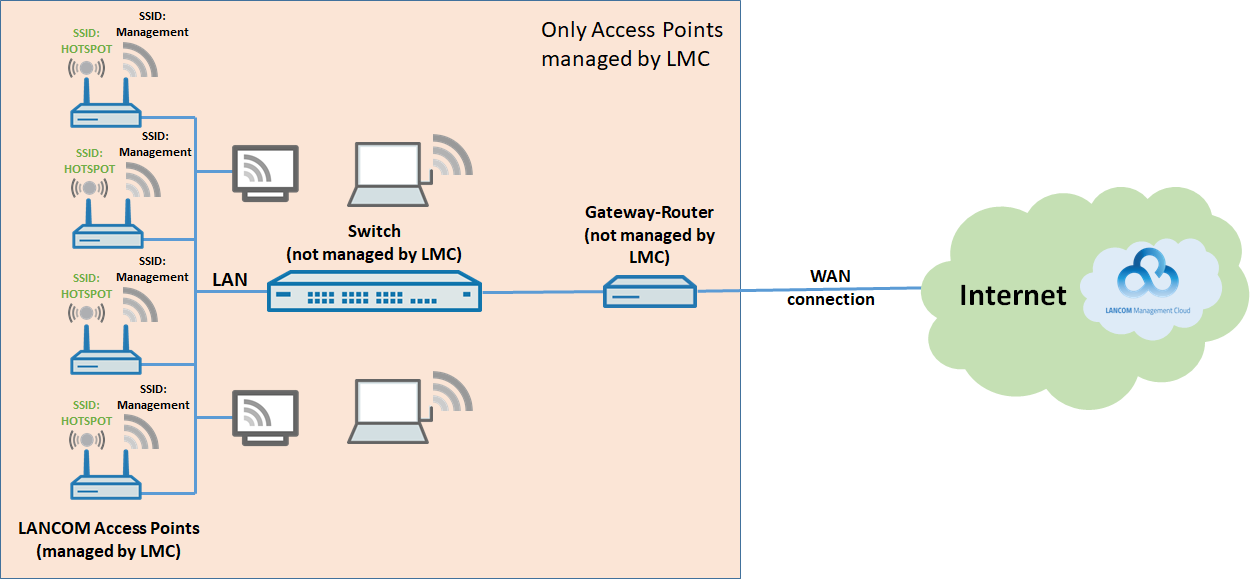
Das bestehende Szenario soll nun um einen WLAN-Zugang für Gäste erweitert werden:
- Es soll eine weitere SSID von allen Access Points ausgestrahlt werden (z.B. "HOTSPOT").
- Das Gast-WLAN soll in einem eigenen lokalen Netzwerk betrieben werden, welches keinen Zugriff auf das Management-Netzwerk der Firma hat und in welchem die Benutzer ausschließlich den Internet-Zugang verwenden können.
- Es soll keine Kommunikation zwischen den im Gast-WLAN angemeldeten WLAN Clients möglich sein.
Procedure:
1. Konfigurationsschritte in der LMC:
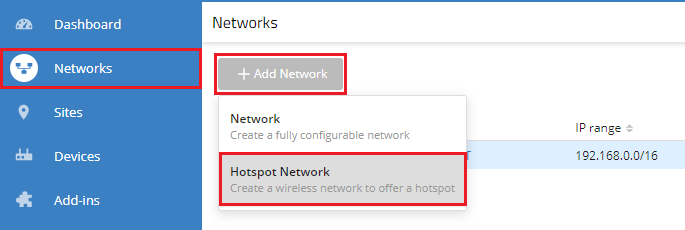
1.1 Öffnen Sie Ihr LMC-Projekt, wechseln in das Menü Netze und klicken dort auf Netz hinzufügen → Hotspot-Netz.
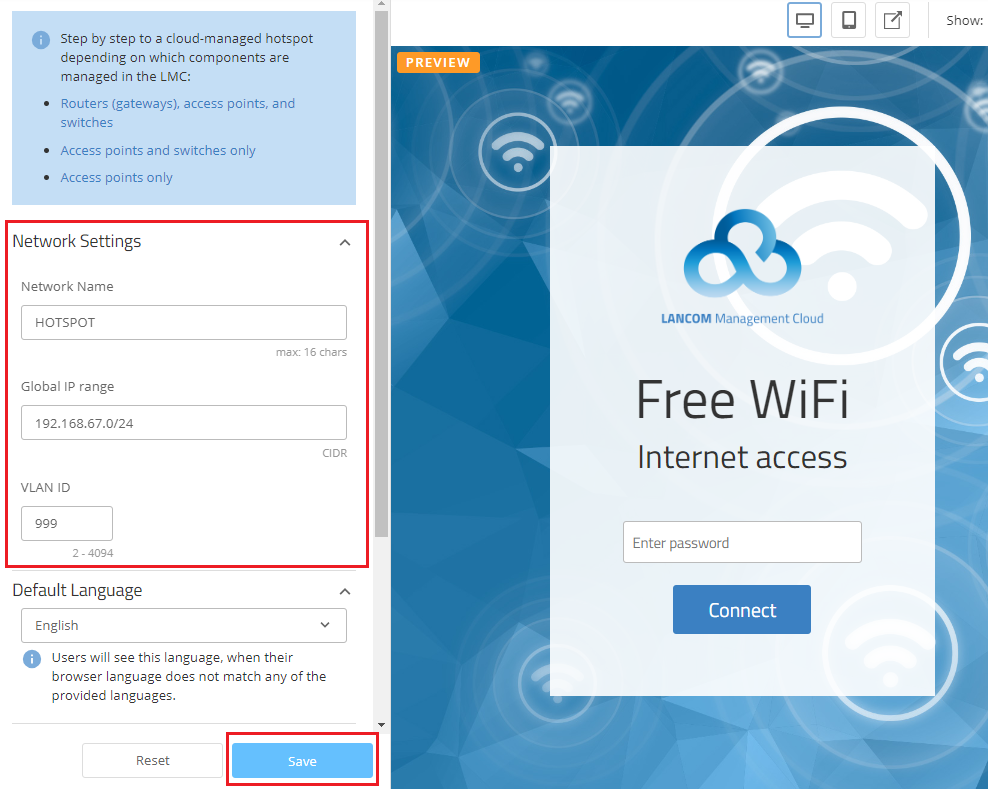
1.2 Legen Sie Im Bereich Netzeinstellungen die grundlegenden technischen Einstellungen für das neue Hotspot Netz fest und klicken anschließend auf Speichern:
this example scenario, LANCOM access points are operated behind an existing network infrastructure with components from other manufacturers. In this case, the hotspot is provided with the help of a so-called “overlay”. Here, the hotspot data transfer routes are overlaid on the existing connections.
This uses network address translation (NAT) to ensure that hotspot users and their data are securely isolated from the rest of the company's internal data streams. One of the access points then functions as a “NAT-AP”, i.e. it serves as a gateway for the remaining access points.
| Hinweis |
|---|
Please note that the routing performance of an access point is generally less than that of a router. This means, for example, that the achievable Wi-Fi speed is limited by the access point’s routing performance. We therefore strongly recommend using a high-performance access point as the “NAT-AP” (LX or LN series). |
| Info |
|---|
The gateway router and the switch do not have to support VLAN in order for this scenario to be implemented. This allows the use of an unmanaged switch, which is particularly useful in scenarios where there is no access to the network infrastructure (except for the access points). When using an unmanaged switch, it must be able to pass on VLAN transparently. When operating a managed switch, the hotspot VLAN ID must be configured on it accordingly. |
| Info |
|---|
How to configure a cloud-managed hotspot where all LANCOM devices are managed by the LMC is described in this knowledge base article. How to configure a cloud-managed hotspot where the gateway router is not managed by the LMC is described in this knowledge base article. |
Requirements:
- LCOS as of version 10.42 or LCOS LX as of version 5.30 (download current version)
- Access to the LANCOM Management Cloud (subject to charge)
- Any web browser for accessing the LANCOM Management Cloud
- Functional Wi-Fi network already configured in the LMC
| Info |
|---|
The procedures described below are based on a fully functional network scenario with LANCOM access points that are managed exclusively by the LMC. |
Scenario:
The Wi-Fi in a company is operated with LANCOM access points and managed by the LANCOM Management Cloud:
- Numerous LANCOM access points are used for the Wi-Fi, all of which are managed by the LMC.
- Furthermore, a switch and a third-party router are operated. These of course cannot be managed by the LMC.
- A local network is available to all employees.
- The existing LANCOM access points broadcast a Wi-Fi network with the SSID “Management”. This Wi-Fi can be used by all company employees.
The existing scenario should be upgraded with Wi-Fi access for guests:
- An additional SSID should be broadcast by all access points (e.g. “HOTSPOT”).
- The guest Wi-Fi should be in its own local network that has no access to the company's management network and that offers only Internet access to users.
- There should be no communication between the Wi-Fi clients in the guest Wi-Fi.
Procedure:
1) Configuration steps in the LMC:
1.1) Open your LMC project, navigate to the menu Networks and click Add Network → Hotspot Network.
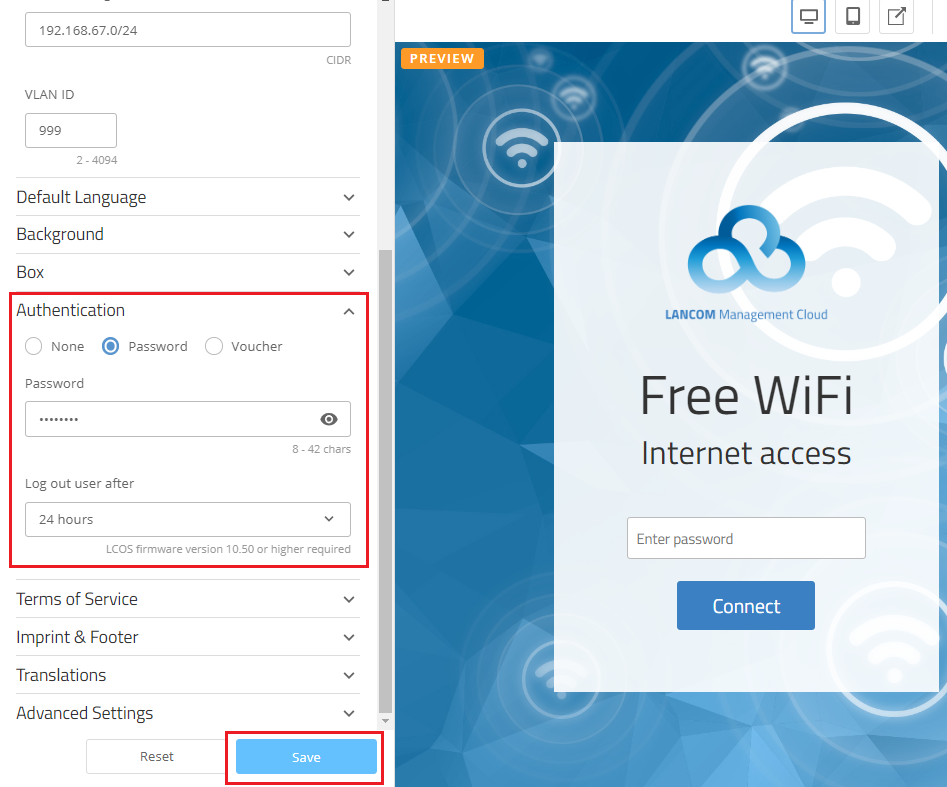
1.2) In the Network Settings section, set up the basic technical settings for the new hotspot network, and then click on Save:
- SSID Name: Enter a descriptive name for the broadcast SSID (e.g. HOTSPOT). This can be max. 16 characters long.
- Global IP range: If necessary adapt the IP address range to be used by the hotspot network. Enter the IP address range in CIDR notation (e.g
- SSID-Name: Vergeben Sie einen aussagekräftigen Namen für die ausgestrahlte SSID (z.B. HOTSPOT). Dieser darf maximal 16 Zeichen lang ein.
- Globaler IP-Bereich: Passen Sie bei Bedarf den IP-Adressbereich an, den das Hotspot Netz verwenden soll. Der IP-Adressbereich muss in CIDR-Notation eingegeben werden (z.B. 172.16.0.0/24).
- VLAN ID: Standardmäßig ist hier die The VLAN - ID is set to 999 vorgegeben. Bei Bedarf können Sie diese anpassen (im Bereich von VLAN-ID 2 bis by default. You can adapt this, if necessary (in the range from VLAN ID 2 to 4094).
| Info |
|---|
Der Zugang zum Hotspot wird nach 24 Stunden automatisch vom System abgemeldet, sodass eine erneute Anmeldung erforderlich ist. |

| Info |
|---|
Standardmäßig ist der WLAN-Hotspot unverschlüsselt. Bei Bedarf können Sie diesen auch verschlüsselt betreiben, indem Sie bei Authentifizierung ein Passwort vergeben. Dieses muss dann von den Gästen beim Login eingegeben werden. Bitte beachten Sie, dass die Konfiguration von separaten Zugangsdaten für einzelne Benutzer nicht möglich ist.
|

1.3 Wechseln Sie in das Menü Standorte und wählen den konfigurierten Standort aus.

You can define in the Authentication menu after what time a user is automatically logged out of the hotspot. To ensure that the text on the splash page is displayed in English, your own text can be specified under Translations. |
| Info |
|---|
By default, the Wi-Fi hotspot is unencrypted. If preferred, you can also operate it with encryption by setting a Password under Authentication. This must then be entered by the guests when they log in. Please note that it is not possible to use separate access credentials for individual users.
If you want to use voucher authentication, select the option provided. For a description of the configuration, see this Knowledge Base article. |
1.3) Go to the Sites menu and select the configured site.
1.4) For the site, change to the Networks tab and click on Assign networks1.4 Wechseln Sie in dem Standort auf den Reiter Netze und klicken auf Netze zuweisen.
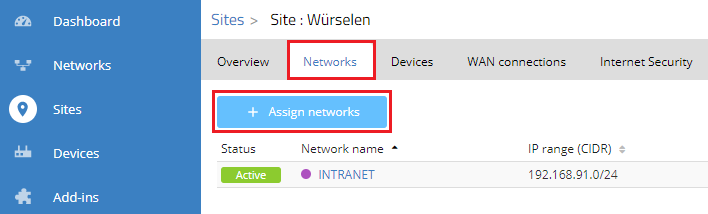
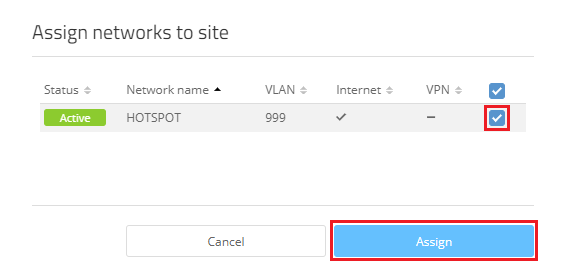
1.5 Wählen Sie das in Schritt ) Choose the hotspot network created in step 1.2 erstellte Hotspot-Netzwerk aus und klicken auf Zuweisen and click Assign.
1.6 Wechseln Sie in das Menü Geräte, markieren alle Access Points, die dem verwendeten Standort zugewiesen sind und klicken auf das Punkte-Symbol in der rechten oberen Ecke) Go to the Devices menu, mark all access points that are assigned to the site and click on the dots icon in the upper right-hand corner.
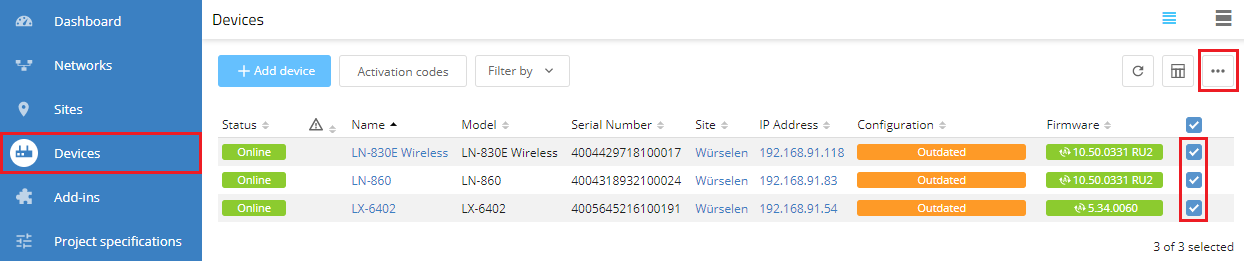
1.7 Klicken Sie auf Konfiguration ausrollen) Click on Configuration roll out.
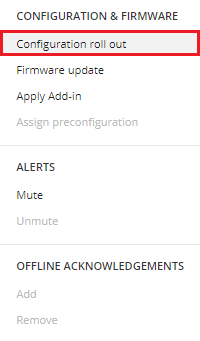
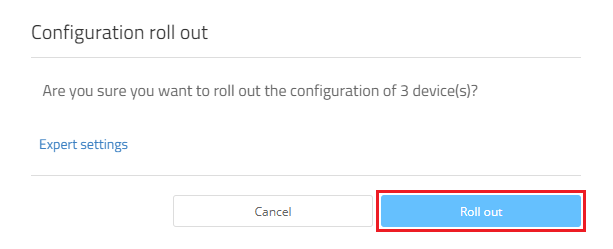
1.8 Bestätigen Sie die Abfrage mit einem Klick auf Ausrollen) Confirm the prompt by clicking on Roll out.
2
...
) Changing the “NAT-AP”:
Die LMC sucht den "NAT-AP" zufällig aus. Daher kann es zwecks höherer Performance sinnvoll sein, diesen zu ändern.
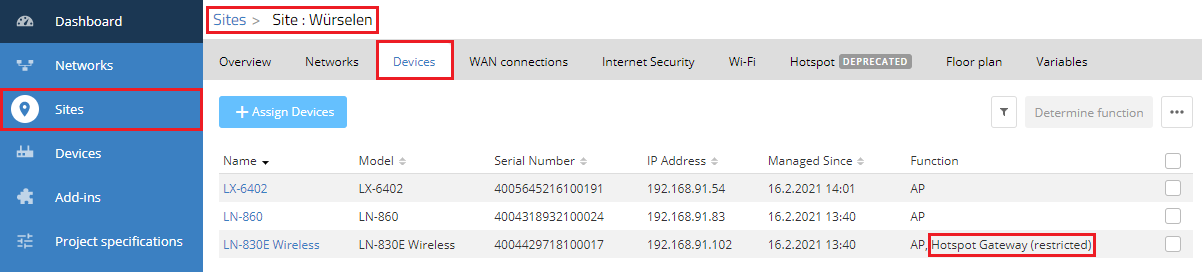
2.1 Wechseln Sie in dem Menü Standorte in den verwendeten Standort und in diesem in den Reiter Geräte.
The LMC selects the “NAT-AP” at random. In the interests of higher performance it may make sense to change this.
2.1) Use the Sites menu to go to the relevant site and then to the tab Devices.
The “NAT-AP” is marked with Hotspot Gateway (restricted)Der "NAT-AP" ist durch die Funktion Hotspot-Gateway (eingeschränkt) gekennzeichnet.
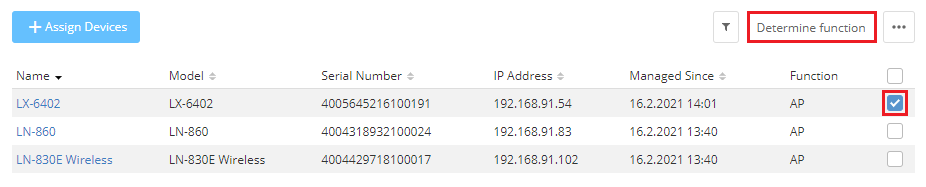
2.2 Markieren Sie den "NAT-AP" und klicken auf Funktion festlegen) Select the “NAT-AP” and click on Determine function.

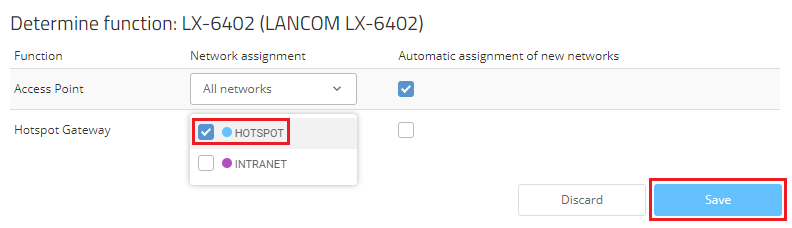
2.3 Entfernen Sie bei Hotspot-Gateway das zugewiesene Hotspot-Netzwerk und klicken auf Speichern) For the Hotspot Gateway, remove the hotspot network assigned to it and click on Save.
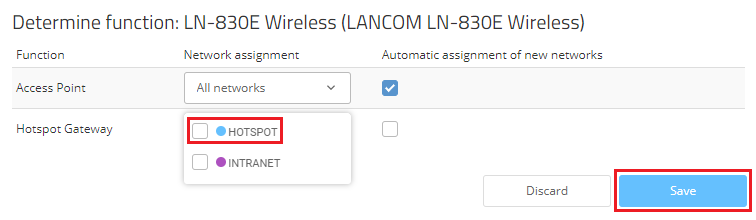
2.4 Markieren Sie den Access Point, der als "NAT-AP" fungieren soll und klicken auf Funktion festlegen) Select the access point that is to act as “NAT-AP” and click Determine function.
2.5 Fügen Sie bei Hotspot-Gateway das zugewiesene Hotspot-Netzwerk hinzu und klicken auf Speichern) For the Hotspot Gateway, add the assigned hotspot network and click Save.
2.6 Wechseln Sie in das Menü Geräte, markieren die Access Points, deren Funktion geändert wurde (Status Nicht aktuell), und klicken auf das Punkte-Symbol in der rechten oberen Ecke) Go to the Devices menu, mark the access points that had a change of function (status Outdated) and click on the dots icon in the upper right-hand corner.

2.7 Klicken Sie auf Konfiguration ausrollen) Click on Configuration roll out.