
Description:
This document describes how to set up a VPN-SSL connection (site-to-site) between two LANCOM R&S®Unified Firewalls (referred to in the following as Unified Firewalls).
Requirements:
- Existing installation on a LANCOM R&S®Unified Firewall with a firmware version 10.7
- A configured and functional Internet connection on each Unified Firewall
- Web browser for configuring the Unified Firewall.
The following browsers are supported:- Google Chrome
- Chromium
- Mozilla Firefox
Scenario:
1) The Unified Firewall is connected directly to the Internet and has a public IPv4 address:
A company wants to use an SSL-VPN connection to connect their Unified Firewall at the headquarters to their Unified Firewall at the branch office.
Headquarter:
- The company headquarters has a Unified Firewall as a gateway. It has an Internet connection with the fixed public IP address 81.81.81.1.
- The local network at the headquarters has the IP address range 192.168.23.0/24.
- The headquarters is configured as a site-to-site server which accepts inbound SSL-VPN connections.
Branch office:
- The branch office has a Unified Firewall as a gateway. This has an Internet connection with the fixed public IP address 82.82.82.2.
- The local network at the branch office has the IP address range 192.168.24.0/24.
- The branch office is configured as a site-to-site client which initiates outbound SSL-VPN connections.

A company wants to use an SSL-VPN connection to connect their Unified Firewall at the headquarters to their Unified Firewall at the branch office.
Headquarter:
- The company headquarters has a Unified Firewall as the gateway and an upstream router for the Internet connection. The router has the fixed public IP address 81.81.81.1.
- The local network at the headquarters has the IP address range 192.168.23.0/24.
- The headquarters is configured as a site-to-site server which accepts inbound SSL-VPN connections.
Branch office:
- The branch office has a Unified Firewall as the gateway and an upstream router for the Internet connection. The router has the fixed public IP address 82.82.82.2.
- The local network at the branch office has the IP address range 192.168.24.0/24.
- The branch office is configured as a site-to-site client which initiates outbound SSL-VPN connections.

Procedure:
The setup for scenarios 1 and 2 are basically the same. Scenario 2 additionally requires port forwarding to be set up on the upstream router (see section 4).
Damit sowohl die Unified Firewall in der Zentrale als auch die Unified Firewall in der Filiale VPN-SSL Einwahl-Verbindungen annehmen können, muss auf beiden Unified Firewalls jeweils eine eigene CA sowie zwei VPN-SSL Zertifikate erstellt werden. Eines der VPN-SSL-Zertifikate wird dann in den VPN-SSL-Einstellungen hinterlegt und dient zum Entschlüsseln der Verbindungen. Anschließend wird das andere VPN-SSL Zertifikat mitsamt der Zertifikatskette exportiert und in der jeweils anderen Unified Firewall importiert. Dort wird das importierte Zertifikat in der VPN-SSL Verbindung hinterlegt und dient dort zum Verschlüsseln der Verbindung.
1) Creating certificates and modifying the VPN SSL settings:
1.1) Creating certificates and modifying the VPN SSL settings on the Unified Firewall in the headquarter:
1.1.1) Connect to the Unified Firewall in the headquarter, switch to the menu Certificate Management → Certificates and ckick on the "Plus" symbol to create a new certificate.

1.1.2) Modify the following parameters to create a CA and click Create:
- Certificate Type: Select the option Certificate.
- Template: Select the template Certificate Authority.
- Common Name (CN): Enter a descriptive Common Name (in this example VPN-SSL-CA-Headquarter).
- Private Key Password: Enter a password. This is used for encrypting the Private Key.

1.1.3) Create another certificate by clicking on the "Plus" symbol. This is used in the VPN SSL settings in the headquarter (see step 1.1.8). For this purpose modify the following parameters and click Create:
- Certificate Type: Select the option Certificate.
- Template: Select the template Certificate.
- Common Name (CN): Enter a descriptive Common Name (in this example VPN-SSL-Headquarter).
- Private Key Password: Enter a password. This is used for encrypting the Private Key.
- Validity: Set the validity to at least 5 years. This is advisable, since this certificate is used for all VPN SSL connections.
- Signing CA: In the dropdown menu select the CA created in step 1.1.2.
- CA Password: Enter the Private Key Password entered in step 1.1.2.

1.1.4) Create another certificate by clicking on the "Plus" symbol. This is used in the VPN SSL connection in the branch office. For this purpose modify the following parameters and click Create:
- Certificate Type: Select the option Certificate.
- Template: Select the template Certificate.
- Common Name (CN): Enter a descriptive Common Name (in this example VPN-SSL-Headquarter-Office).
- Private Key Password: Enter a password. This is used for encrypting the Private Key.
- Signing CA: In the dropdown menu select the CA created in step 1.1.2.
- CA Password: Enter the Private Key Password entered in step 1.1.2.
You can also modify the Validity of the certificate if needed.

1.1.5) For the certificate created in step 1.1.4 click on the button for the certificate export.

1.1.6) Select the format PEM / CRT, activate the option Export Certificate Chain and click Export.

1.1.7) Switch to the menu VPN → VPN SSL → VPN SSL Settings.

1.1.8) Activate the VPN SSL service via the slider, modify the following parameters and click Save:
- Host certificate: In the dropdown menu select the VPN certificate created in step 1.1.3.
- Private Key Password: Enter the Private Key Password entered in step 1.1.3.
- Routes: Enter the networks in CIDR notation (Classless InterDomain Routing), which should be accessible via the VPN connection. In this example, the local network at the headquarter has the IP address range 192.168.23.0/24.
- Encryption Algorithm: On the tab Site-to-Site select the option AES 256.
If necessary, you can change the Protocol and the Port. The Adress Pool is the range of IP addresses that are assigned to the dial-in VPN SSL clients. This address range may not already be in use as an internal network in the Unified Firewall.

1.2) Creating certificates and modifying the VPN SSL settings on the Unified Firewall in the branch office:
1.2.1) Connect to the Unified Firewall in the branch office, switch to the menu Certificate Management → Certificates and ckick on the "Plus" symbol to create a new certificate.

1.2.2) Modify the following parameters to create a CA and click Create:
- Certificate Type: Select the option Certificate.
- Template: Select the template Certificate Authority.
- Common Name (CN): Enter a descriptive Common Name (in this example VPN-SSL-CA-Office).
- Private Key Password: Enter a password. This is used for encrypting the Private Key.

1.2.3) Create another certificate by clicking on the "Plus" symbol. This is used in the VPN SSL settings in the branch office (see step 1.2.8). For this purpose modify the following parameters and click Create:
- Certificate Type: Select the option Certificate.
- Template: Select the template Certificate.
- Common Name (CN): Enter a descriptive Common Name (in this example VPN-SSL-Office).
- Private Key Password: Enter a password. This is used for encrypting the Private Key.
- Validity: Set the validity to at least 5 years. This is advisable, since this certificate is used for all VPN SSL connections.
- Signing CA: In the dropdown menu select the CA created in step 1.2.2.
- CA Password: Enter the Private Key Password entered in step 1.2.2.

1.2.4 Create another certificate by clicking on the "Plus" symbol. This is used in the VPN SSL connection in the headquarter. For this purpose modify the following parameters and click Create:
- Certificate Type: Select the option Certificate.
- Template: Select the template Certificate.
- Common Name (CN): Enter a descriptive Common Name (in this example VPN-SSL-Office-Headquarter).
- Private Key Password: Enter a password. This is used for encrypting the Private Key.
- Signing CA: In the dropdown menu select the CA created in step 1.1.2.
- CA Password: Enter the Private Key Password entered in step 1.1.2.
You can also modify the Validity of the certificate if needed.

1.2.5 For the certificate created in step 1.2.4 click on the button for the certificate export.

1.2.6 Select the format PEM / CRT, activate the option Export Certificate Chain and click Export.

1.2.7) Switch to the menu VPN → VPN SSL → VPN SSL Settings.
1.2.8) Activate the VPN SSL service via the slider, modify the following parameters and click Save:
- Host certificate: In the dropdown menu select the VPN certificate created in step 1.2.3.
- Private Key Password: Enter the Private Key Password entered in step 1.2.3.
- Routes: Enter the networks in CIDR notation (Classless InterDomain Routing), which should be accessible via the VPN connection. In this example, the local network at the branch office has the IP address range 192.168.24.0/24.
- Encryption Algorithm: On the tab Site-to-Site select the option AES 256.

2) Importing the certificates:
2.1) Importing the VPN SSL certificate on the Unified Firewall in the headquarter:
2.1.1) On the Unified Firewall in the headquarter go to the menu Certificate Management → Certificates and click on the button for the certificate import.

2.1.2) Leave the setting on Import Certificate, select the certificate file exported in the branch office in step 1.2.6) and click Import.
Since the Private Key has not been exported as well no passwords have to be entered.

2.2) Importing the VPN SSL certificate on the Unified Firewall in the branch office:
2.2.1 On the Unified Firewall in the branch office go to the menu Certificate Management → Certificates and click on the button for the certificate import.

2.2.2 Leave the setting on Import Certificate, select the certificate file exported in the headquarter in step 1.1.6) and click Import.
Since the Private Key has not been exported as well no passwords have to be entered.

3. Konfiguration der SSL-VPN-Verbindungen und Erstellen von Firewall-Regeln:
3.1 Konfiguration der SSL-VPN-Verbindungen und Erstellen von Firewall-Regeln auf der Unified Firewall in der Zentrale:
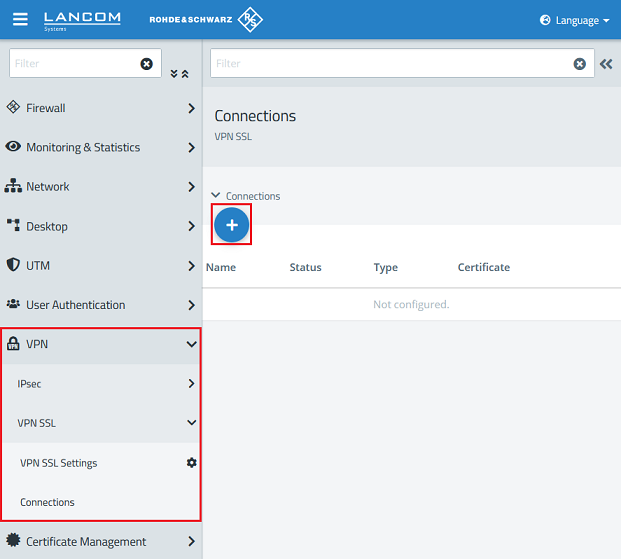
3.1.1 Wechseln Sie in der Zentrale in das Menü VPN → VPN-SSL → Verbindungen und klicken auf das "Plus-Zeichen", um eine neue VPN-SSL-Verbindung zu erstellen.
3.1.2 Passen Sie die folgenden Parameter an und klicken auf Erstellen:
- Name: Vergeben Sie einen aussagekräftigen Namen (in diesem Beispiel VPN_SSL_Filiale). Beachten Sie dabei, dass der Name nur Buchstaben, Zahlen und Unterstriche enthalten darf.
- Zertifikat: Wählen Sie im Dropdownmenü das in Schritt 2.1.2 importierte VPN-Zertifikat aus.
- Verbindungstyp: Wählen Sie die Option Site-To-Site (Server) aus.
- Remote-Netzwerke: Fügen Sie das lokale Netzwerk der Filiale hinzu (in diesem Beispiel 192.168.24.0/24).

3.1.3 Klicken Sie auf das Symbol zum Erstellen eines VPN-Netzwerks.

3.1.4 Passen Sie die folgenden Parameter an und klicken auf Erstellen:
- Name: Vergeben Sie einen aussagekräftigen Namen (in diesem Beispiel VPN-SSL-Filiale).
- VPN-Verbindungstyp: Wählen Sie die Option VPN-SSL aus.
- VPN-SSL-Verbindung: Wählen Sie im Dropdownmenü die in Schritt 3.1.2 erstellte VPN-Verbindung aus.

3.1.5 Klicken Sie auf das in Schritt 3.1.4 erstellte VPN-Netzwerk, wählen das "Verbindungswerkzeug" aus und klicken anschließend auf das Netzwerk-Objekt, auf welches die Site-to-Site VPN-Verbindung zugreifen können soll, damit die Firewall-Objekte geöffnet werden.

3.1.6 Weisen Sie über die "Plus-Zeichen" die erforderlichen Protokolle der Verbindung zu.


3.1.7 Klicken Sie abschließend auf Aktivieren, damit die vorgenommenen Änderungen von der Unified Firewall umgesetzt werden. Die Konfigurationsschritte auf der Unified Firewall in der Zentrale sind damit abgeschlossen.

3.2 Konfiguration der SSL-VPN-Verbindungen und Erstellen von Firewall-Regeln auf der Unified Firewall in der Filiale:
3.2.1 Wechseln Sie in der Filiale in das Menü VPN → VPN-SSL → Verbindungen und klicken auf das "Plus-Zeichen", um eine neue VPN-SSL-Verbindung zu erstellen.
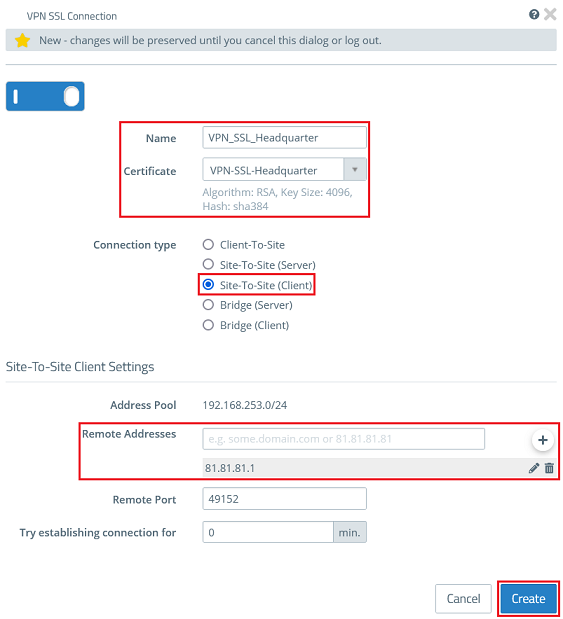
3.2.2 Passen Sie die folgenden Parameter an und klicken auf Erstellen:
- Name: Vergeben Sie einen aussagekräftigen Namen (in diesem Beispiel VPN_SSL_Zentrale). Beachten Sie dabei, dass der Name nur Buchstaben, Zahlen und Unterstriche enthalten darf.
- Zertifikat: Wählen Sie im Dropdownmenü das in Schritt 2.2.2 importierte VPN-Zertifikat aus.
- Verbindungstyp: Wählen Sie die Option Site-To-Site (Client) aus.
- Remote-Adressen: Tragen Sie die öffentliche IP-Adresse oder den DNS-Namen der Unified Firewall in der Zentrale ein.
3.2.3 Klicken Sie auf das Symbol zum Erstellen eines VPN-Netzwerks.
3.2.4 Passen Sie die folgenden Parameter an und klicken auf Erstellen:
- Name: Vergeben Sie einen aussagekräftigen Namen (in diesem Beispiel VPN-SSL-Zentrale).
- VPN-Verbindungstyp: Wählen Sie die Option VPN-SSL aus.
- VPN-SSL-Verbindung: Wählen Sie im Dropdownmenü die in Schritt 3.2.2 erstellte VPN-Verbindung aus.

3.2.5 Klicken Sie auf das in Schritt 3.2.4 erstellte VPN-Netzwerk, wählen das "Verbindungswerkzeug" aus und klicken anschließend auf das Netzwerk-Objekt, auf welches die Site-to-Site VPN-Verbindung zugreifen können soll, damit die Firewall-Objekte geöffnet werden.

3.1.6 Weisen Sie über die "Plus-Zeichen" die erforderlichen Protokolle der Verbindung zu.


3.1.7 Klicken Sie abschließend auf Aktivieren, damit die vorgenommenen Änderungen von der Unified Firewall umgesetzt werden. Die Konfigurationsschritte auf der Unified Firewall in der Filiale sind damit abgeschlossen.
- Der Port für SSL-VPN lässt sich in der Unified Firewall ändern.
- Sollte ein Router eines anderen Herstellers verwendet werden, erfragen Sie die Vorgehensweise bei dem jeweiligen Hersteller.
4.1 Öffnen Sie die Konfiguration des Routers in LANconfig und wechseln in das Menü IP-Router → Maskierung → Port-Forwarding-Tabelle.

- Anfangs-Port: Hinterlegen Sie den Port 49152.
- End-Port: Hinterlegen Sie den Port 49152.
- Intranet-Adresse: Hinterlegen Sie die IP-Adresse der Unified-Firewall im Transfernetz zwischen Unified Firewall und LANCOM Router.
- Protokoll: Wählen Sie im Dropdown-Menü UDP aus.
