
Description:
This document describes the error analysis options for WAN connections (xDSL, Plain Ethernet).
Performing remote troubleshooting of a WAN connection absolutely requires a functional separate WAN connection (e.g. 3G/4G), which can be used to connect to the device.
Procedure:
1) Check whether the device is properly connected:
Check whether a router with integrated xDSL modem is correctly connected to the telephone socket.
2) Check whether synchronization is possible:
Using the command line of the LANCOM router you can check with the command ls Status/VDSL/ whether the DSL synchronization was successful.
If the Line-State shows the parameter SHOWTIME the synchronization was successful. The parameters negotiated with the DSLAM are also displayed (e.g. the Data-Rate-Downstream-kbps, which represents the download speed).

The LEDs Online and DSL on the device also provide information about the current connection status:
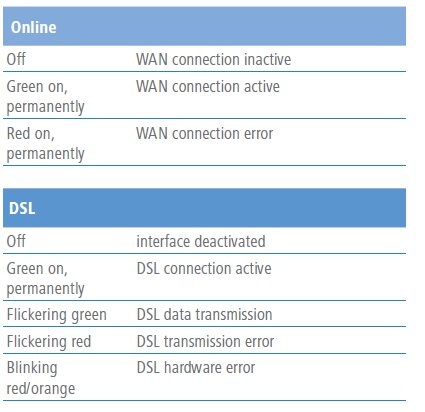
3) Check the settings of the WAN interface:
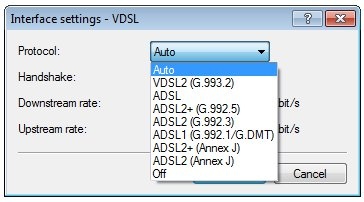
Check the setting of the WAN interface in the menu Interfaces → WAN → Interface settings → xDSL.
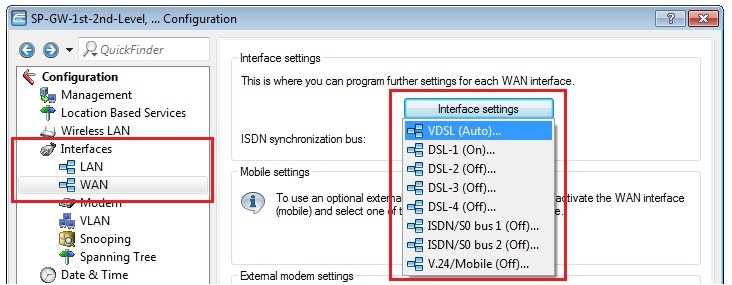
By default, the parameter here is set to Automatic. If no connection is established with this setting, in rare cases it may help the to set the DSL protocol. Your Internet provider will be able to provide you information about the DSL protocol.
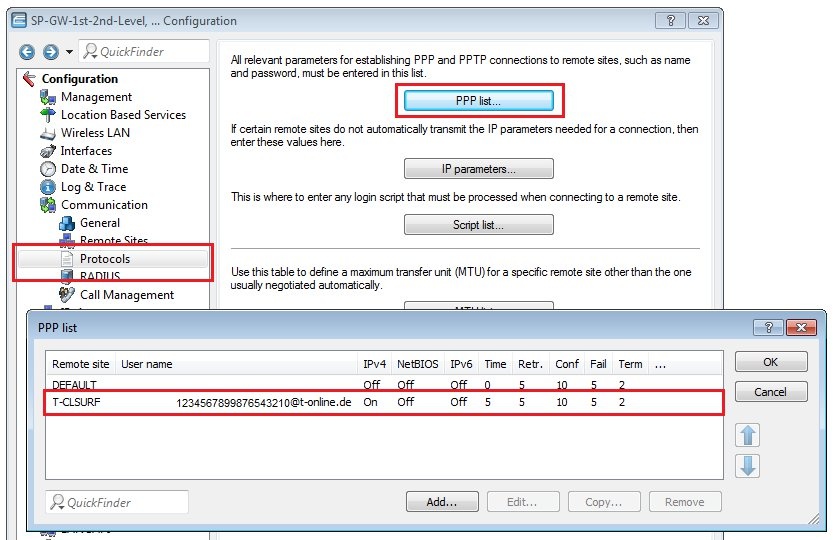
4) Check the access credentials in the PPP list:
In the menu Communication → Protocols → PPP list you will find the access credentials (user name and password). Open the entry and check whether the access credentials have been entered correctly.
You can check whether the wrong access credentials are being used in LANmonitor under the menu item WAN connections or by means of a PPP trace, where you will see the message "PAP-NAK received".
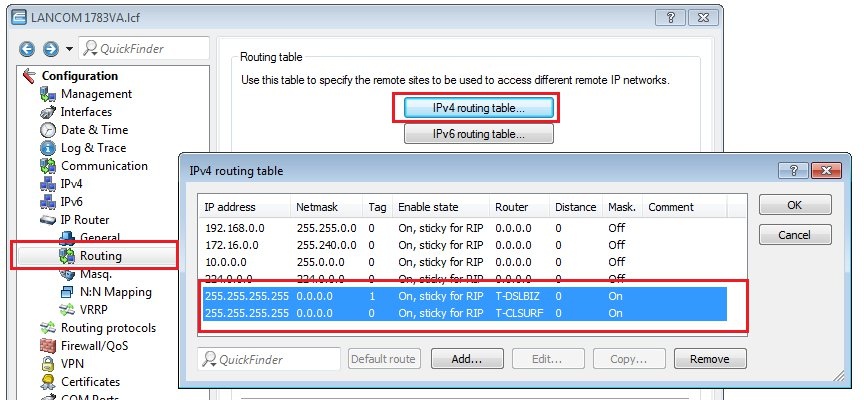
5) Check the default route(s):
Check whether a default route for the Internet connection is entered into the IP routing table and that IP masquerading is switched on. If you use multiple DSL connections, each connection requires a default route with a unique routing tag (see the following figure).
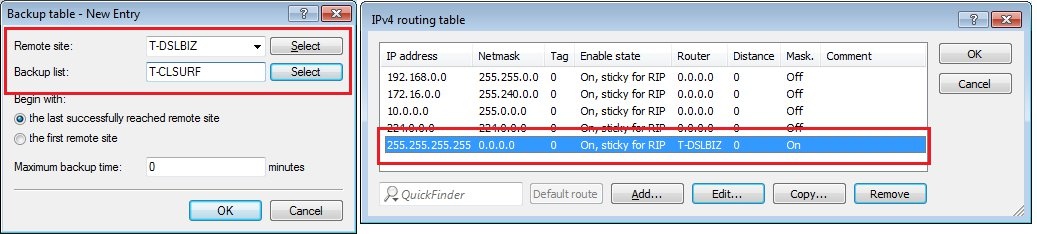
Information about a backup scenario:
In a backup scenario, the backup WAN connection must not be entered into the IP routing table as a route.
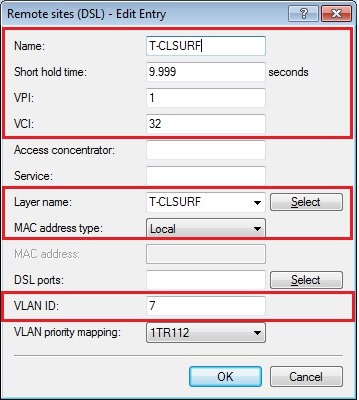
6) Check the settings of the DSL remote site:
Check the connection parameters of the WAN connection in the menu Communications → Remote sites → Remote sites (DSL).
- Is the short-hold time entered correctly? With the value 9999, connections are established immediately and without a time limit.
- Are the correct VPI / VCI values entered? These values are given to you by your DSL carrier and must only be entered if you use the internal modem of the LANCOM router. Typical values for VPI/VCI are, for example: 0/35, 0/38, 1/32, 8/35, 8/48.
- Are you using the correct communication layer?
- For VDSL connections, a VLAN ID is always required. Make sure that the correct ID is entered here.
7) Check the settings of the communication layer being used:
In the menu Communication → General → Communication layers, check that the correct settings for the communication layer are being used.
If you set up your Internet connection using the Setup Wizard, the values entered here for the communication layer should be correct.

8) Check the IP parameters (for Plain Ethernet connections):
If you are using an Internet connection with a fixed IP address (without PPP) or a pool of IP addresses, go to the menu Communication → Protocols → IP parameters and check whether you are using the IP parameters that were communicated by your provider.

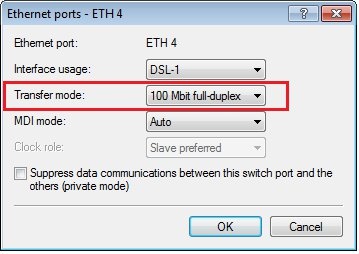
For Plain Ethernet connections being operated on the LANCOM router's Ethernet port:
- Go to the menu Interfaces → LAN → Ethernet ports and check that the Ethernet port has been set with a logical WAN interface (e.g. DSL-1).
- It is possible, that the Provider router uses a fixed port speed.
- In this case set the Transfer mode of the Ethernet port to the fixed value of the Provider router (in this example 100 Mbps full duplex).
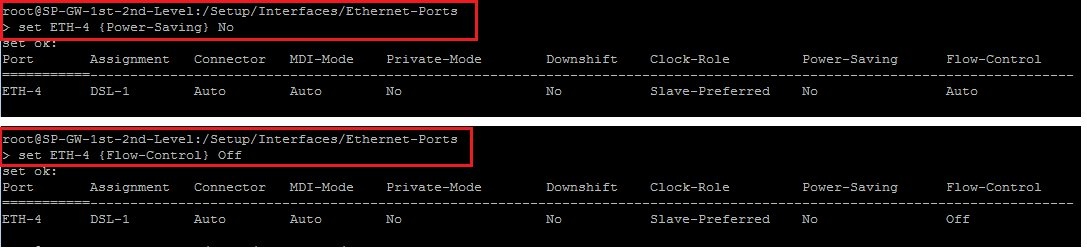
Start an SSH session to the LANCOM router and navigate to the menu Setup → Interfaces → Ethernet-Ports ( cd /Setup/Interfaces/Ethernet-Ports ).
- Use the command ls to display the current settings of the Ethernet ports.

- If the power saving is enabled, turn this off with the command set <ETH-interface> {Power-Saving} No ab (e.g. set ETH-4 {Power-Saving} No). Check now whether you can connect to the Internet.
- In addition, you can use the command set <ETH-interface> {Flow-Control} Off to switch the flow control off (e.g. set ETH-4 {Flow-Control} No).
9) Perform traces for troubleshooting and analysis:
9.1) Recording xDSL traces on a router with an integrated modem:
Troubleshooting guide: xDSL connection cannot be established or terminates
9.2) Recording traces for a PPPoE connection on a router with an external modem:
9.2.1) Connect to the router via the LANtracer and import the appended trace configuration into the trace module.

The procedure to create a trace with a prefabricated trace configuration is described in this Knowledge Base article.
9.2.2) Start the trace with a click on the button with the green arrow and record the error state.
The dial-in attempt or the termination of the connection has to be included in the trace output!
9.2.3) Stop the trace with a click on the button with the stop sign and save it with a click on the button with the floppy disk symbol.
9.3) Recording traces for a DHCPoE connection:
9.3.1) Connect to the router via the LANtracer and import the appended trace configuration into the trace module.
The procedure to create a trace with a prefabricated trace configuration is described in this Knowledge Base article.
9.3.2) Start the trace with a click on the button with the green arrow and record the error state.
The dial-in attempt or the termination of the connection has to be included in the trace output!
9.3.3 Stop the trace with a click on the button with the stop sign and save it with a click on the button with the floppy disk symbol.
10) Sending the information to LANCOM Support:
If the problem cannot be solved with the steps provided in this article, please contact LANCOM Support with the following information:
- Information about the Provider and type of Internet connection
- Time of the dial-in attempt or the connection termination
- Trace recorded in the error state with the attached trace configuration (*.lct file)
- Current configuration file of the router (*.spf file)